

Read this article for things you should know about owning the new Polaris RANGER XD 1500, including some new and existing features.
For information about using the vehicle, read 2024 RANGER XD 1500 Operation, Towing and Hauling with the 2024 RANGER XD 1500 or the quick start guide.
Safety
Read Safety Tips for Polaris RANGER for more information.
This vehicle is equipped with three-point lap and diagonal seat belts for the operator and any passengers. Always make sure the seat belts are secured for all riders before operating. The driver’s seat belt is equipped with a seat belt interlock. Vehicle speed will be limited to 15 MPH (24 km/h) if the seat belt is not secured. The driver's seat belt must be engaged for the vehicle creep to function.
Warning: Falling from a moving vehicle could result in serious injury or death. Always fasten your seat belt securely before operating or riding in the vehicle.
VIN Location
The Vehicle Identification Number (VIN) label is located on the driver's rear vehicle chassis frame in the wheel well. For additional help locating the VIN or engine serial number, read Locating the VIN on Your Polaris RANGER.
Dash Layout
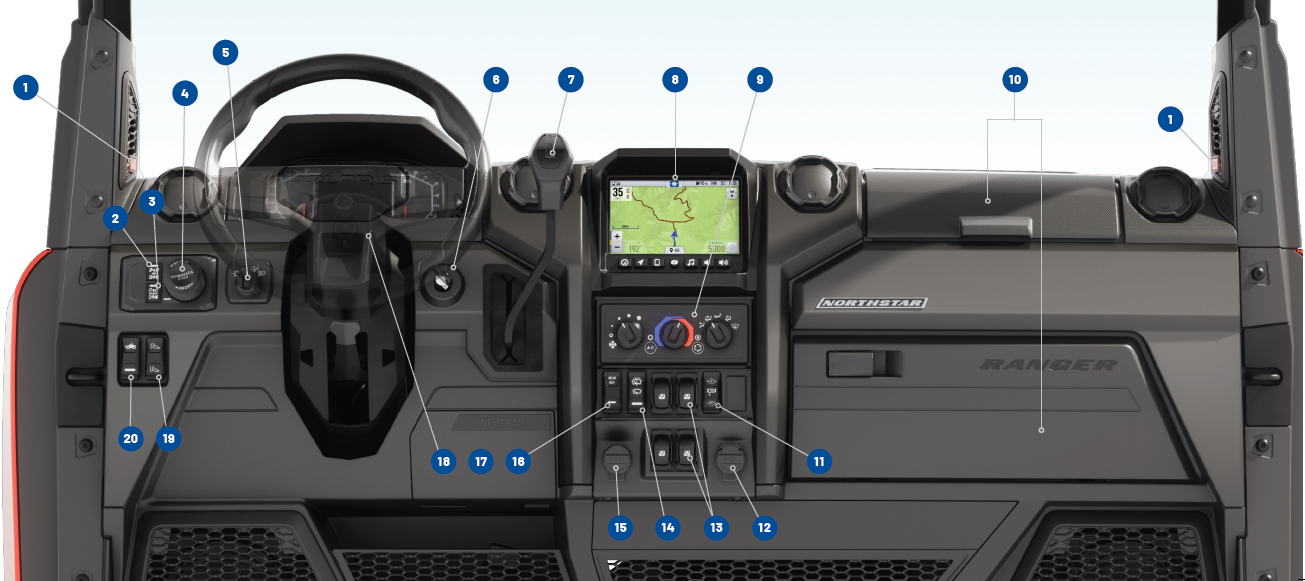
1. JBL® Trail Pro Audio
2. On-Demand AWD
3. Rear Differential Lock
4. Drive Modes Dial (Comfort, Sport, Standard, Tow/Haul)
5. Headlight Switch
6. Ignition Switch
7. Shifter with Drive, Reverse and Park
8. Display Powered by RIDE COMMAND (If Equipped)
9. HVAC Control Panel (If Equipped)
10. Storage Compartments
11. Winch Switch (If Equipped)
12. Dual USB Outlet
13. Power Window Switches (If Equipped)
14. Windshield Wiper/Washer Switch (If Equipped)
15. 12V Power
16. Rear Bed 12V Aux Power Switch (If Equipped)
17. Transmission Neutral Disconnect (Under Trim Cover)
18. Steering Wheel Adjustment Lever (Tilt and/or Telescopic)
19. Cargo Box Lift Switch (If Equipped)
20. Auxiliary Lights (If Equipped)
Instrument Cluster
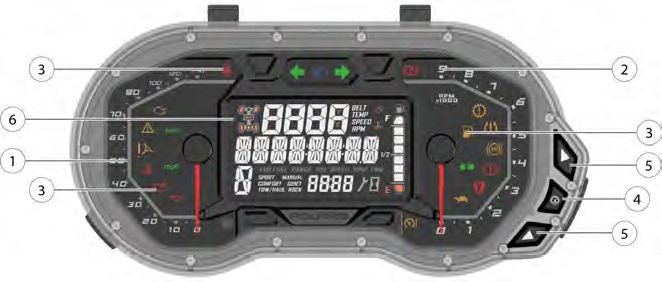
1. Speedometer is customizable to miles per hour (MPH) or kilometers per hour (km/h).
2. Tachometer displays engine speed in revolutions per minute (RPM).
3. Indicator Lamps show standard warnings and communications.
4. Mode Button allows you to enter/exit the settings menu.
5. Toggle Buttons allow you to navigate options and settings.
6. Rider Information Center provides the time, AWD indicator, fuel gauge, service indicator, gear indicator and speed limitation (if equipped).
High water pressure may damage components. Wash the vehicle by hand or with a garden hose using mild soap. Certain products, including insect repellents and chemicals, will damage the speedometer lens and other plastic surfaces. Do not use alcohol to clean the instrument cluster. Do not allow insect sprays to contact the lens. Immediately clean off any gasoline that splashes on the instrument cluster.
RIDE COMMAND (If Equipped)
Vehicles with the Ultimate trim come equipped with a 7" Display powered by RIDE COMMAND. For more information about the infotainment system, read Overview of the 2019+ 7" Display Powered by RIDE COMMAND.
NorthStar Ultimate Editions are also factory-equipped with RIDE COMMAND+, while Premium and NorthStar Premium models are compatible with a RIDE COMMAND+ accessory upgrade. For more information about RIDE COMMAND+ features and capabilities, read RIDE COMMAND+ for Off-Road Vehicles.
Light Switch
The ignition switch key must be in the ON/RUN position to operate the headlights. Rotate the switch clockwise to turn on the desired lights. Rotate the switch counter clockwise to change lights or turn the headlights off. Note: Blackout mode will only be active in minimal light situations.
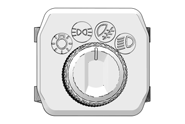
Position 1 (leftmost): Blackout mode. Headlights will be completely off. Switch Lighting, Instrument Cluster and 7" Display powered by RIDE COMMAND will all dim.
Position 2: Accent lights.
Position 3: Low beam headlights.
Position 4 (rightmost): High beam headlights.
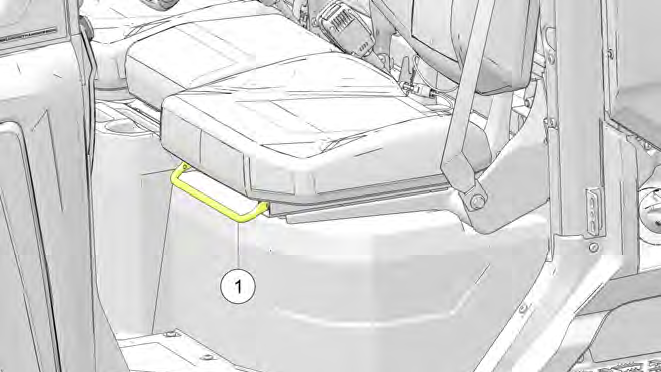
Seat Adjustment
The driver's seat position is adjustable from front to rear. To adjust, pull up on the adjustment lever (1) under the seat. When the desired position is found, release the adjustment level. Rock the seat forward and backward to ensure the seat is properly locked into place.
Care and Cleaning
Keeping your Polaris RANGER XD 1500 clean will not only improve its appearance, but it can also extend the life of various components.
Certain products, including insect repellents and chemicals, will damage plastic surfaces. Do not allow these types of products to contact the vehicle.
The best and safest way to clean your vehicle is with a garden hose and a pail of mild soap and water.
1. Use a professional-type washing cloth, cleaning the upper body first and the lower parts last.
2. Rinse with clean water frequently.
3. Dry surfaces with a chamois to prevent water spots.
Tips
- Avoid the use of harsh cleaners, which can damage the finish.
- Do not use medium to heavy duty compounds on the finish.
- Always use clean cloths and pads for cleaning and polishing. Old or reused cloths and pads may contain dirt particles that will scratch the finish.
- Clean seat belts with warm water. Avoid damaging seat belts. Do not use bleach, dye or household detergents. Do not use a pressure washer to clean the seat belts.
- If warning and safety labels are damaged, contact your Polaris Dealer for free replacement.
- Grease all zerk fittings (if applicable) immediately after washing. Allow the engine to run for a while to evaporate any water that may have entered the engine or exhaust system.
Pressure Washer
If a high pressure water system is used for cleaning, exercise extreme caution. The maximum pressure should not exceed 4000 PSI, 2.5 GPM with a 40° pressure washer nozzle. Make sure to keep the pressure washer nozzle 23.6 inches (60 cm) away from the surface being cleaned. The water may damage components and could remove paint and labels. High water pressure may damage radiator fins and impair a radiator’s effectiveness. High pressure may also damage other vehicle components. Avoid directing the water stream at the following items: HVAC system (NorthStar models only) wheel bearings, radiator, transmission seals, brakes, cab and body panels, labels and decals, electrical components and wiring, air intake components, throttle and shift cables and controls, seat belts, seats and door and window seals (if equipped).
Cleaning the Skid Plates
Mud and debris can become trapped under the skid plate of the vehicle, which may cause shifting or other drivability issues. If the vehicle fails to shift correctly from PARK to DRIVE or from DRIVE to PARK, check the skids plates for mud and other material accumulation. If the skids plates have accumulated an excessive amount of mud or other material, a water source may be used to help clean the skid plate areas.
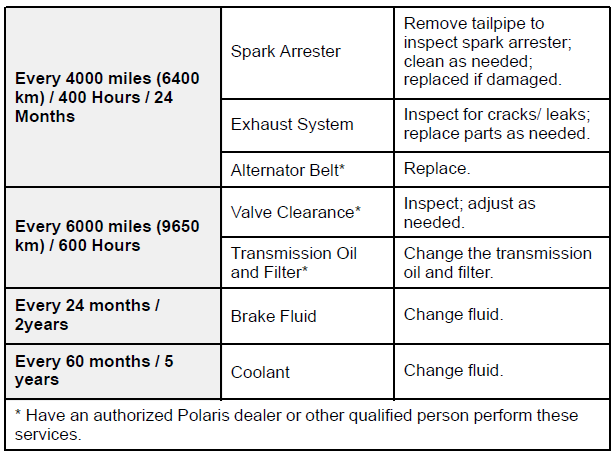
Maintenance Schedule
The intervals shown are based on vehicles operated under normal conditions.
Each interval is given in hours and miles (kilometers). Items should be serviced at whichever interval comes first.
Vehicles subjected to severe use must be serviced at 50% of the stated interval. Examples of Severe Use: Frequent immersion in mud, water or sand, constant high RPM use, prolonged low-speed heavy load operation, extended idle and short trip cold weather operation.
Click or tap the heading for the maintenance tasks required in the interval.
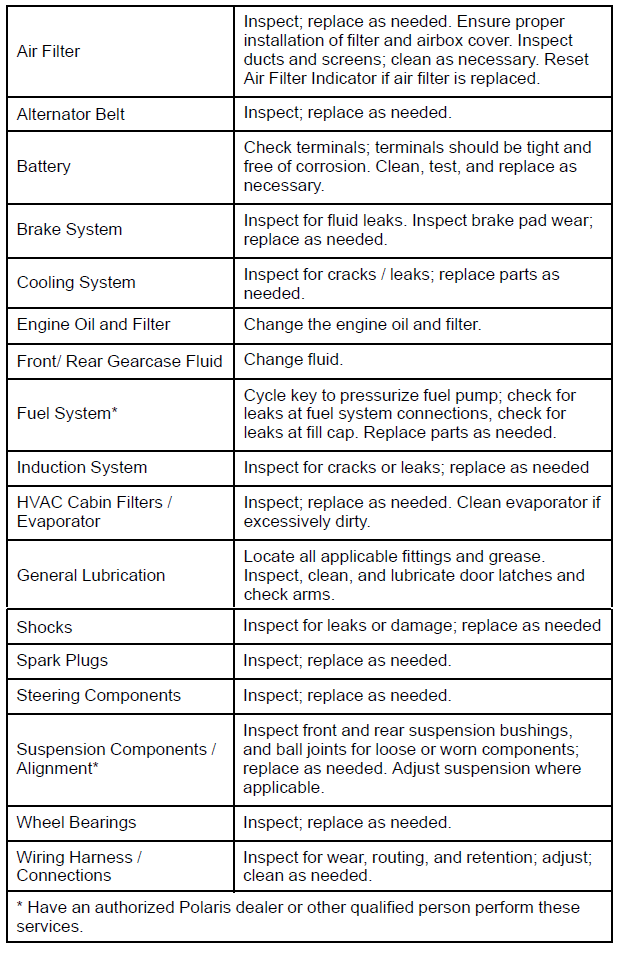
For more information, see your authorized Polaris Dealer. Find a dealer near you with the Dealer Locator.
Maintenance tips, procedures and specifications can be found in your Owner's Manual.
JBL® is a registered trademark of Harman International Industries
Unless noted, trademarks are the property of Polaris Industries Inc.
© 2023 Polaris Industries Inc.


