

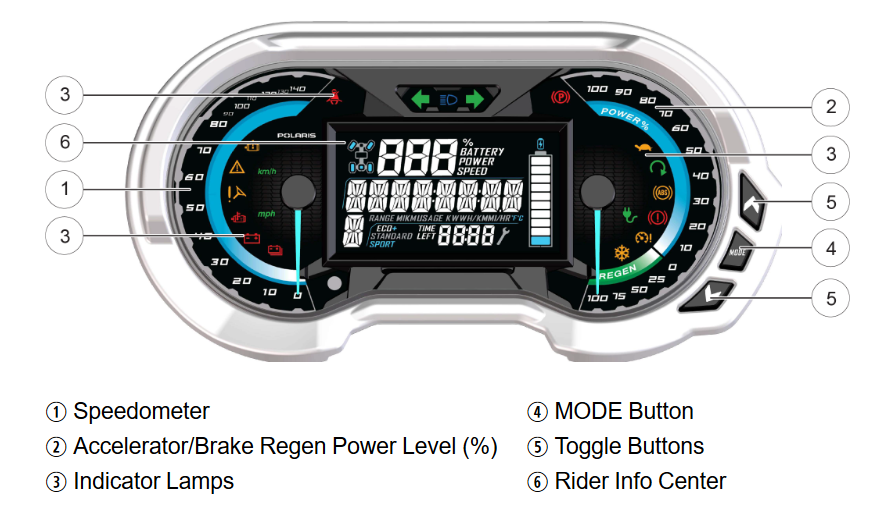
The instrument cluster consists of:
1. A speedometer that displays vehicle speed in either miles per hour (MPH) or kilometers per hour (km/h).
2. Power Usage vs Brake Regen Meter: The POWER% level displays the percentage (%) of motor power applied as a result of pushing down on the accelerator pedal. The REGEN level displays the percentage (%) of available regenerative braking torque applied.
3. Indicator Lamps that indicate different operating conditions and warnings.
| Icon | Function |
 | When standard mode is selected, vehicle speed displays in miles per hour. |
 | When metric mode is selected, vehicle speed displays in kilometers per hour. |
 | The High-Voltage Battery Pack indicator illuminates when a failure or fault has occurred in the vehicle’s high-voltage battery pack. |
 | The Check 12V Battery warning indicates when the 12V battery is exhibiting low voltage. |
 | The Over Temperature indicator illuminates when components of the electronic powertrain (such as the motor or high-voltage battery) are overheating. Continued operation may result in reduced performance to allow powertrain component temperatures to recover. |
 | EPS Warning (if equipped) illuminates briefly when the key is turned to the ON position. If the light remains on, the EPS system is inoperative. See your Polaris Dealer as soon as possible. Continued operation could result in permanent damage to the EPS unit and increased steering effort. |
 | The Amber Warning Light (AWL) indicator illuminates when an error condition or minor fault has been detected by the vehicle’s computer. Consult the Owner's Manual to identify the condition/fault detected. See your Polaris Dealer if the condition/fault persists. |
 | The Malfunction Indicator Light indicator illuminates when an error condition or serious fault has been detected by the vehicle’s computer. Consult the Owner's Manual to identify the condition/fault detected. See your Polaris Dealer if the condition/fault persists. |
 | The Helmet/Seat Belt lamp is a reminder to the operator to ensure all riders are wearing helmets and seat belts before operating. The driver's seat belt is equipped with a seat belt interlock. Vehicle speed will be limited to 15 mph (24 km/h) if the seat belt is not secured. |
 | The High Beam lamp illuminates when the headlamp switch is set to high beam. |
 | The Park Brake lamp illuminates when the park brake is applied (if equipped). |
 | The Speed Limitation Indicator is illuminated when the Speed Limitation function is active. |
 | The Active Status Indicator illuminates when the vehicle accelerator pedal is active. Pressing on the accelerator pedal when this light appears will result in movement in the direction selected (forward or reverse). |
 | The Charging Indicator illuminates to confirm the vehicle is connected to a charger. It does not confirm the flow of charge to the vehicle, which is only confirmed by text on the Rider Information Center or the display powered by RIDE COMMAND (if equipped). If this light flashes, an error has occurred, and the vehicle will not charge. |
 | The Overspeed Indicator illuminates when the vehicle’s Speed Limitation function is active, and the vehicle travels at speeds in excess of the limitation (such as when moving downward on a hill). |
 | The Cold Temperature Indicator illuminates when vehicle components are below their ideal operating temperature: 32° F (0° C). The vehicle may experience reduced performance when this light is active. Allow the battery heaters several minutes to warm up before operating. See the Owner's Manual for details on extreme weather operation. |
4 & 5. Mode and Toggle buttons that allow you to navigate the Rider Info Center. Press and hold the MODE button to enter or exit the settings menu. Press and release the MODE button to cycle through Area 1 modes and to select an item. Press and release either toggle button to cycle through the options menu or Area 2 modes. Press and hold either toggle button to reset an item.
6. Rider Information Center gives information that can't be indicated with a warning lamp. All segments will light up for one second at start-up.
The information center is set to display standard units of measurement and a 12-hour clock at the factory. To change to metric and/or a 24-hour clock, hold the mode button and cycle to the clock menu. Use the directional arrows to change the clock settings.
If the instrument cluster fails to illuminate, a battery over-voltage may have occurred and the instrument cluster may have shut off to protect the electronic speedometer. If this occurs, your Polaris Dealer can provide proper diagnosis.
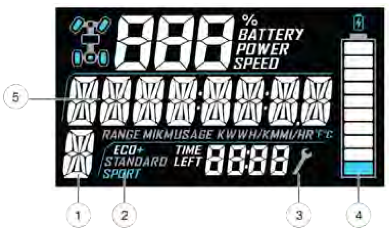
| Item | Indicator | Description |
| 1 | Gear Indicator | This indicator displays gear shifter position. H = High Gear L = Low Gear N = Neutral R = Reverse Gear P = Park - = Gear Signal Error (or shifter between gears) |
| 2 | Drive Mode Indicator | This indicator shows whether ECO+, STANDARD or SPORT Mode is active. See the Owner's Manual for more information. |
| 3 | Service Indicator | A flashing wrench symbol alerts the operator that the preset service interval has been reached. Your Polaris Dealer can provide scheduled maintenance. |
| 4 | Remaining Charge Gauge | The segments of the charge gauge show the level of charge held by the high-voltage battery pack(s). When the last segment clears, a low charge warning is activated. The outline of the charge display will flash. Recharge the vehicle. |
| 5 | Speed Limitation (if equipped) | This vehicle may be equipped with a maximum speed limitation function. This would be displayed on the screen as "LIM" followed by the speed. For example, "LIM 30." |
The top and middle rows of the Rider Information Center can be modified to show different information.
The top row can be cycled by pressing the mode button. The top row will display: Battery Pack State of Charge (SoC) (remaining battery pack charge %), vehicle speed (MPH/KPH) and Motor Power Level (% applied as a result of pushing down on the accelerator pedal).
The center row can be cycled by pressing the arrow buttons. This row will display: odometer, trip meters (T1/T2; see the Owner's Manual to reset), ambient temperature, efficiency (average pack output in watt-hours per mile/km), range estimated (remaining range in miles/km) and service interval (flashing wrench symbol).
Settings/Options
Use the Mode and Toggle buttons to navigate the options menu. Holding the mode button will bring you to the options menu.
1. Press and release either toggle button to cycle to the desired option.
2. Press MODE to select the option.
3. Press either toggle button to cycle to the desired setting.
4. Press MODE to save and exit to the settings menu.
5. Press and hold the MODE button to exit the settings menu.
In this menu you can:
- View diagnostic trouble codes,
- Select units of measurement for vehicle speed and temperature,
- Change the back-light brightness,
- Customize service hours
- And Check EV status.
Note: Vehicles equipped with a 7" Display powered by RIDE COMMAND may have fewer selections available through the instrument cluster OPTIONS screen. Certain selections would only be accessible on the display.
Electric vehicle (EV) component details can be viewed using the EV INFO option.
1. Press and hold the MODE button to enter the settings menu.
2. Press either toggle button to cycle to the “EV INFO” option. Press MODE to select.
3. Press either toggle button to cycle to the desired electric component status.
- Motor Temperature
- Motor Control Unit (MCU) Temperature
- Vehicle Dynamics Control (VDC)
- Battery Pack Life Efficiency (watt hour per mile/km)
- Battery Pack Temperature
4. Press MODE to return to the settings menu.
To learn how to adjust the backlight color, backlight brightness, clock, performance limitations (if equipped), display units, trip meter, trip time and programmable service interval in the Owner's Manual. For information about entering and resetting the PIN for P.A.S.S. on the instrument cluster, read 2023 RANGER XP Kinetic P.A.S.S. Operation or P.A.S.S. Anti-Theft System.
Diagnostic Trouble Codes
The error screen displays only when the Amber Warning Light (AWL) indicator is on or when it goes on and off during one startup cycle. Error codes are not stored. When the key switch is in the OFF position, the code and message is lost but will reappear if the fault reoccurs after restarting the vehicle.
If the Malfunction Indicator Light (MIL) or the EPS lamp illuminates, retrieve the active error codes from the display.
1. Press and hold the MODE button to enter the settings menu.
2. Press either toggle button to cycle to the “DIAGCODE” option. Press MODE to select.
3. More than one diagnostic code may be present. Press the toggle UP button to see if more codes are present. Press MODE to select a code. Notice: If the displayed code is an engine fault code, the CHECK ENGINE lamp will blink. If the displayed code is an EPS fault code, the EPS lamp will blink.
4. Record the three (3) numbers displayed: Failure Mode Indicator (top row), Suspect Parameter Number (middle row) and Code Count (bottom row).
5. Press MODE to exit to the settings menu.
Cleaning
High water pressure may damage components. Wash the vehicle by hand or with a garden hose using mild soap. Certain products, including insect repellents and chemicals, will damage the speedometer lens and other plastic surfaces. Do not use alcohol to clean the instrument cluster. Do not allow insect sprays to contact the lens.
For more information, see your authorized Polaris Dealer. Find a dealer near you with the Dealer Locator.
Maintenance tips, procedures and specifications can be found in your Owner's Manual.
To find diagrams and replacement part numbers, use the online parts catalog.
Unless noted, trademarks are the property of Polaris Industries Inc.
© 2023 Polaris Industries Inc.


