

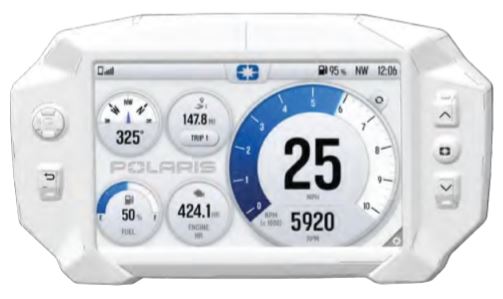
The 7" Display, shown below, is equipped on model year 2022 and newer Sportsman 570 RIDE COMMAND Edition and Sportsman XP 1000 RIDE COMMAND Edition vehicles.
Buttons and Controls
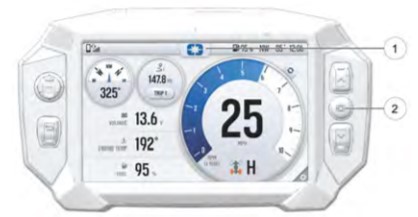
The display features five hard buttons on the display itself: a 5-Way UI Control button (1), a Back button (5), the Up and Down buttons (2 and 4) and the Polaris NorthStar button (3). 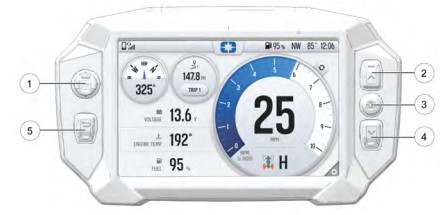
The 5-Way UI Control button (1), shown below, moves the cursor and pans the focus on the map screen.
The Up and Down buttons (2 and 4), shown below, zoom in and out of the map and scroll through lists of features.
The Polaris NorthStar button (3), shown below, opens and closes the Badge Panel.
The Back button (5), shown below, cycles all screens and backs the user out of menus.
GAUGE SCREEN
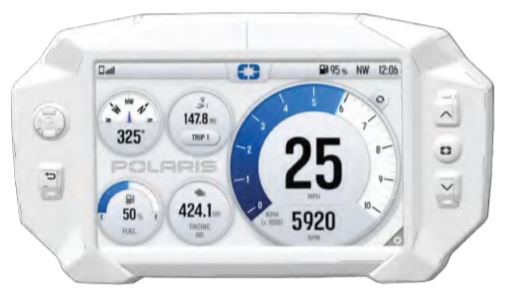
The Gauge Screen displays upon start-up and will serve as your primary interface when operating the vehicle.
The Gauge Screen is fully customizable and can be configured to display as much, or as little, vehicle information as you like.
Options include vehicle speed, RPM, fuel level, engine temperature, engine hours, trip meter, battery voltage and compass.
Configuring the Gauge Screen
The display allows up to four customized gauge screens. All but one screen can be deleted; one will always remain as the default.
Note: In the gauge configuration panel, display buttons and hand controls will not work. You must use the touchscreen to change screen settings and layouts.
Follow the instructions below to create customized gauge screens.
1. Press the Gear icon in the bottom right corner of the touchscreen.
2. On the right side of the configuration panel, press the SCREENS tab (1) then ADD NEW (2).
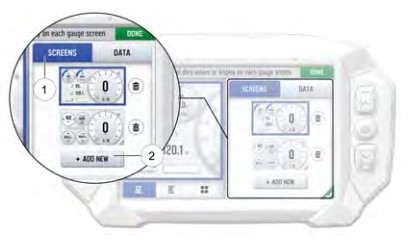
3. In the left side panel, choose a gauge layout from the three provided options.
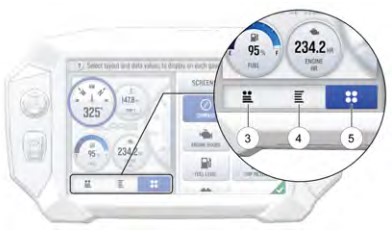
| Icon | Description |
| 3 | Two circular widgets and up to three linear widgets |
| 4 | Up to five linear widgets |
| 5 | Four circular widgets |
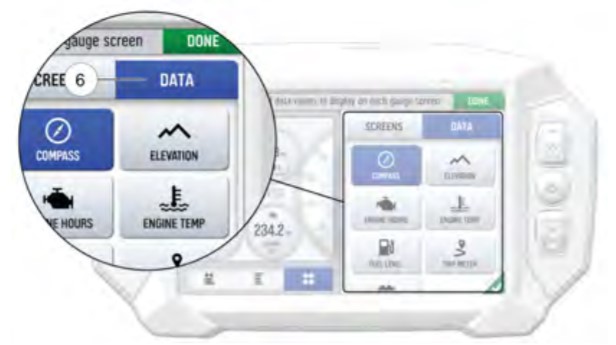
4. Select the DATA tab (6). As the widget slots on the left are selected, the selection of what data item to populate that widget slot is selected from the list on the right.
For single value slots, choose 1 data item. For list slots, choose up to 3 or up to 5 data items, depending on the configuration of the gauge layout as selected above.
Note: Keep your display software up-to-date as more widget options become available.
5. Reorder the widgets by pressing and holding down on the widget and sliding the widget up or down into the desired position.
6. Click the green check mark or DONE to close the configuration panel.
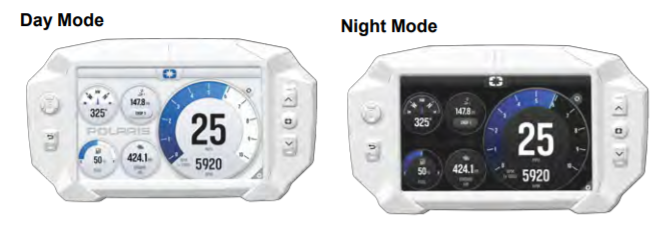
Gauge View Mode
Press reverse icon next to the MPH dial to toggle between the two available gauge view modes – analog and digital.
ICON BAR
The Icon Bar is located across the top of the touchscreen and displays cell phone, headset and wireless internet connectivity; fuel level; compass heading and local time. For help connecting your phone or Bluetooth® headset to the display, read Connecting Bluetooth® Devices to the 7" ATV Display Powered by RIDE COMMAND.
Note: The Icon Bar will not appear when the Badge Panel is open.
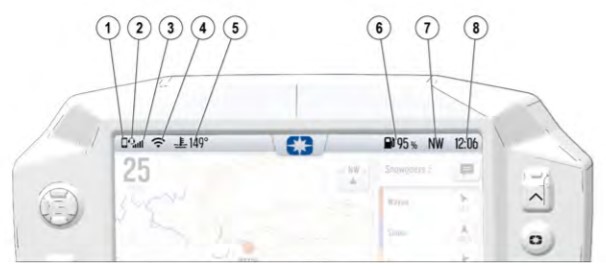
| Icon | Description | Function |
| 1 | Mobile Device Indicator | Displays icon if mobile device is connected |
| 2 | Headset Indicator | Displays icon if headset is connected |
| 3 | Cellular Signal Strength | Displays current cellular signal strength |
| 4 | Wireless Internet Signal Strength | Displays current wireless internet signal strength |
| 5 | Engine Temperature | Displays current engine temperature |
| 6 | Fuel Level | Displays current fuel capacity percentage |
| 7 | Vehicle Direction | Displays vehicle direction |
| 8 | Clock | Displays current time |
BADGE PANEL
The Badge Panel provides easy access to frequently used features, basic displays, vehicle controls and a list of recent notifications.
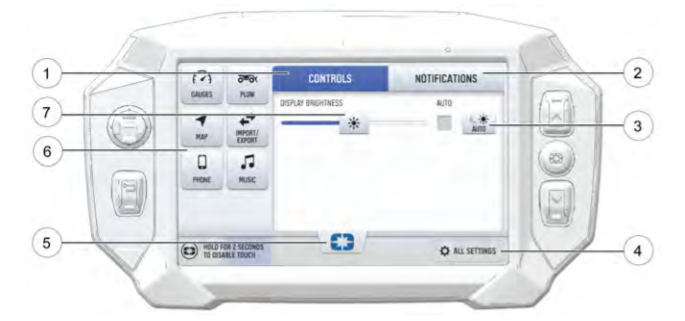
(1) Controls Tab
(2) Notifications Tab
(3) Day/Night Display Mode
(4) All Settings Button
(5) Badge Panel Button
(6) App Tray
(7) Display Brightness
Accessing the Badge Panel
There are two ways to open the Badge Panel – press the Badge Panel button (1) at the top of the touchscreen display or the Polaris Menu hard button (2) to the right of the display.
APP TRAY
The app tray provides easy access to key features on the display screen. Tap on any of the listed icons to navigate to that display screen.
For example, tap the Maps button to navigate to the Map Screen, or press the Music button to navigate to the audio screen.
CONTROLS TAB
Press the Controls tab to change the display mode, display brightness and fuel type.
Display Mode
From the Controls tab, select the display mode from the available options. The display mode can be set to Day, Night or Auto mode.
Display Brightness
From the Controls tab, select display brightness by moving the touchscreen slider to the left or right. Press the AUTO check box to allow the screen to adjust automatically based on ambient light conditions.
NOTIFICATIONS TAB
Press the Notifications tab to view DTC codes, installed software and vehicle warnings.
ENGINE OVERHEAT INDICATOR
If the engine goes over temperature, a red banner will appear at the top of your display stating: ENGINE OVERHEATING – STOP IMMEDIATELY.
The appearance of this banner indicates continued operation of your ATV could result in serious engine damage.
The engine management system will automatically reduce engine power and set a fault. Stop the engine immediately. Allow the engine to cool down.
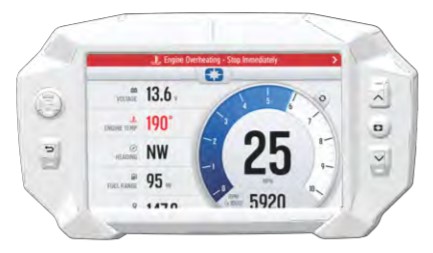
Note: If engine overheating seems to be caused by something other than poor cooling conditions, see your dealer for service.
For more information on the 7" Display, consult the RIDE COMMAND website or read the User's Guide.
To browse all RIDE COMMAND articles, read Guide to RIDE COMMAND for Off-Road Vehicles.
For more information, see your authorized Polaris Dealer. Find a dealer near you with the Dealer Locator.
Bluetooth® is a registered trademark of Bluetooth Sig, Inc.
Unless noted, trademarks are the property of Polaris Industries Inc.
© 2023 Polaris Industries Inc.


