

Your Polaris RANGER 150 youth vehicle safety features include geofencing, engine start passcodes, speed limitation, and helmet aware technology (2022+ RANGER 150s only). To utilize these features, download the Polaris App powered by RIDE COMMAND on your smartphone. To learn more about RIDE COMMAND, visit the RIDE COMMAND website.
The video below walks you through how to setup safety features and controls through the Polaris App powered by RIDE COMMAND for your RANGER 150 EFI.
Adding Your RANGER 150 to the Polaris App
1. Enable Bluetooth® on your device.
2. Open the Polaris App powered by RIDE COMMAND.
3. Put the vehicle into accessory position by turning the key to the first key position.
4. Tap the MORE button in the lower-right corner of the Polaris App. Choose GARAGE.
5. Tap the "+" sign in the upper-right corner of the Polaris App.
6. Tap ADD WITH BLUETOOTH. The app is now scanning for your RANGER 150 EFI. It will show up in the list once it is found. Note: You may also add your Vehicle Identification Number (VIN) to the app manually.
7. Tap on the discovered RANGER 150 EFI once it shows up in the list.
8. Give your vehicle a name and other optional info shown on your app screen. Tap DONE.
9. A Bluetooth® symbol will illuminate in the upper-left corner of your vehicle's digital gauge when your vehicle is connected. A green arrow will display on the Vehicle Settings screen in the Polaris App.
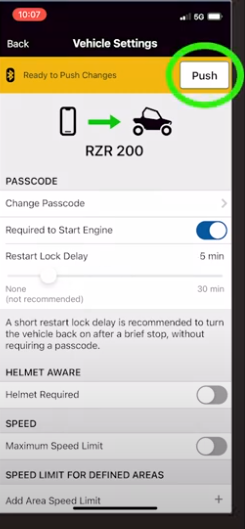
Setting a Passcode
A passcode (four-digit PIN) is required to enable and modify the youth features of your RANGER 150 EFI. To set your PIN, do the following.
1. Enable Bluetooth® on your device.
2. Ensure the RANGER 150 EFI is in your Garage on the Polaris App.
3. Put the vehicle into accessory position by turning the key to the first key position.
4. Select VEHICLE SETTINGS from your vehicle's Garage page.
5. Select CREATE PASSCODE.
6. Enter a four-digit passcode. Re-enter the passcode to confirm.
7. Tap the checkmark button in the lower-right-hand corner to continue.
8. You can choose whether the passcode is required to start the engine on your RANGER 150 and set a restart lock delay from the Vehicle Settings menu. These options only become available after the passcode has been created.
9. Tap "Push" in the upper right corner of the Vehicle Settings page to enable those changes for your RANGER 150.
10. Follow the same steps to change an existing passcode on the Polaris App.
How to Change Your Passcode on Your RANGER 150
To change an existing PIN from your vehicle's digital gauge, do the following:
1. Press and hold the MODE button to enter the Options Menu. Note that “OPTIONS” will display on the screen for 3 seconds before displaying the first menu item.
2. Select YOUTH MENU by pressing the MODE button.
3. Enter the existing PIN. If your PIN is lost or displaced, please contact your Polaris Dealer for assistance.
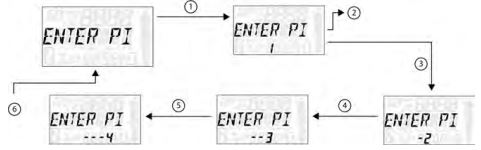
4. Select CHANGE PIN from the Youth Menu by pressing the MODE button. Reference the above image.
- (1) Press the MODE button.
- (2) Toggle the Up/Down buttons to increase/decrease the first digit of the new PIN.
- (3) With the desired first digit of the new PIN displayed, press the MODE button, which will set the digit and move to the second digit.
- (4) Toggle the Up/Down buttons to increase/decrease the second digit of the new PIN. Press the MODE button to set the second digit and move on to the third digit.
- (5) Toggle the Up/Down buttons to increase/decrease the third digit of the new PIN. Press the MODE button to set the third digit and move on to the fourth digit. Toggle the Up/Down buttons to increase/decrease the fourth digit.
- (6) Press the MODE button to set the fourth digit and exit.
5. To exit the Youth Menu, do one of three things:
- Select the Exit Menu function from the Youth Menu.
- Hold the MODE button and exit out of the Youth Menu.
- Do not press any button for 10 seconds, which will exit out of the Options Menu.
Require Passcode to Start Engine
By activating the passcode protection, you now have control of who operates the vehicle and when the vehicle is operated. When enabled, the passcode must be entered before the engine starts. If your child is out riding, a restart option allows you to restart the vehicle within a predetermined time limit before having to re-enter the passcode.
You can turn on this option if you want the passcode to be required to start the engine of your RANGER 150. When this option is enabled, the engine will not be allowed to start without entering the passcode on the display in the vehicle.
1. In the Polaris App, on the Vehicle Settings screen, turn the Passcode option for "Required to Start Engine" to the on position.
2. Enable the changes to your RANGER 150 by tapping "Push" in the upper right hand corner of the Vehicle Settings screen in the app.
You also can turn on this feature from the vehicle itself.
To do this on the digital gauge, do the following:
1. Press and hold the MODE button to enter the Options Menu. Note that “OPTIONS” will display on the screen for 3 seconds before displaying the first menu item.
2. Select YOUTH MENU by pressing the MODE button.
3. Enter your PIN.
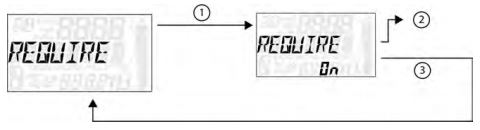
4. Select REQUIRE PIN TO START from the Youth Menu by pressing the MODE button. Reference the image shown above:
- (1) Press the MODE button.
- (2) Toggle the Up and Down buttons to enable or disable requiring the PIN to start the vehicle.
- (3) With the desired option displayed, press the MODE button, which will set the function and return to the Youth Menu.
5. To exit the Youth Menu, do one of three things:
- Select the Exit Menu function from the Youth Menu.
- Hold the MODE button and exit out of the Youth Menu.
- Do not press any button for 10 seconds, which will exit out of the Options Menu.
Restart Lock Delay
If a passcode is required to start the engine, a restart lock delay also can be enabled. This will allow the RANGER 150 to be restarted without a passcode for a specified period of time. For example: Your RANGER 150 was started with a passcode and, after operating, was turned off or was stalled. A restart lock delay of 10 minutes will allow the engine to be restarted without a passcode for 10 minutes since the time the engine stopped.
1. in the Vehicle Settings screen on your RIDE COMMAND app, ensure the Passcode option REQUIRED TO START ENGINE is enabled.
2. Tap on RESTART LOCK DELAY.
3. Choose an amount of time for the delay.
4. Enable the changes to your RANGER 150 by tapping "Push" in the upper right corner of the Vehicle Settings screen in the app.
You can also turn on this feature from the vehicle itself.
To do this on the digital gauge, do the following:
1. Press and hold the MODE button to enter the Options Menu. Note that “OPTIONS” will display on the screen for 3 seconds before displaying the first menu item.
2. Select YOUTH MENU by pressing the MODE button.
3. Enter your PIN.
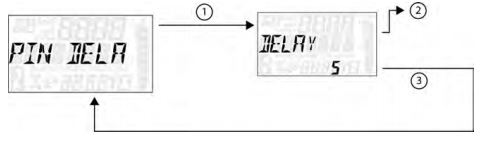
4. Select PIN DELAY from the Youth Menu by pressing the MODE button. Reference the image shown above:
- (1) Press the MODE button.
- (2) Toggle the Up and Down buttons to enable or disable PIN delay.
- (3) With the desired option displayed, press the MODE button, which will set the function and return to the Youth Menu.
5. To exit the Youth Menu, do one of three things:
- Select the Exit Menu function from the Youth Menu.
- Hold the MODE button and exit out of the Youth Menu.
- Do not press any button for 10 seconds, which will exit out of the Options Menu.
Setting a Maximum Speed on Your RANGER 150
You also can use your vehicle's digital gauge to set a maximum speed. To do so, follow these steps:
1. Press and hold the MODE button to enter the Options Menu. Note that "OPTIONS" will display on the screen for 3 seconds before showing the first menu item.
2. Select YOUTH MENU by pressing the MODE button.
3. Enter your PIN.
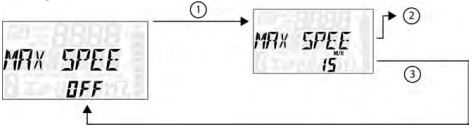
4. Select MAX SPEED from the Youth Menu by pressing the MODE button. Reference the image shown above:
- (1) Press the MODE button.
- (2) Toggle the Up/Down buttons to increase or decrease the max speed. The range is 10-29 miles per hour.
- (3) With the desired max speed displayed, press the MODE button, which will set the max speed and return to the Youth Menu.
5. To exit the Youth Menu, do one of three things:
- Select the Exit Menu function from the Youth Menu.
- Hold the MODE button and exit out of the Youth Menu.
- Do not press any button for 10 seconds, which will exit out of the Options Menu.
Activating a Geofence and Setting Speed Limits on Your RANGER 150
A geofence is a virtual fence that allows you to specify vehicle speeds for inside and outside the area created by a geofence. The inside speed and outside speed can be set individually in any values from 10 to 29 miles per hour. Your RANGER 150 can store three geofences, and only one can be enabled at a time. Note that a geofence is not a replacement for adult supervision. GPS accuracy can vary by region, so make certain to give adequate distance for geofence boundaries to accommodate this variation. A geofence will not stop the vehicle. It will only slow to the adult-entered speed limit.
Once a geofence boundary has been created on the Polaris App, the geofence can be turned on and off and the speeds can be changed through the RANGER 150's digital gauge.
1. Press and hold the MODE button to enter the Options Menu. "OPTIONS" will display on the screen for 3 seconds before showing the first menu item.
2. Select YOUTH MENU by pressing the MODE button.
3. Enter your PIN.
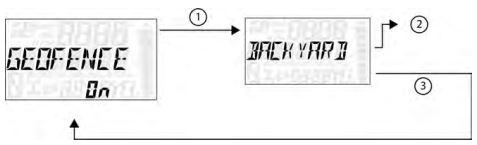
4. Select GEOFENCE from the Youth Menu by pressing the MODE button. Reference the image shown above.
(1) Press the MODE button.
(2) Toggle the Up/Down buttons to cycle between ON and OFF.
(3) With the desired option displayed, press the MODE button, which will set the function and return to the Youth Menu.
5. To exit the Youth Menu, do one of three things:
- Select the Exit Menu function from the Youth Menu.
- Hold the MODE button and exit out of the Youth Menu.
- Do not press any button for 10 seconds, which will exit out of the Options Menu.

To set the vehicle's speed inside of the geofence from the digital gauge, do the following:
1. Press and hold the MODE button to enter the Options Menu. "OPTIONS" will display on the screen for 3 seconds before showing the first menu item.
2. Select YOUTH MENU by pressing the MODE button.
3. Enter your PIN.
4. Select INSIDE from the Youth Menu by pressing the MODE button. Reference the image shown above.
- (1) Press the MODE button.
- (2) Toggle the Up and Down buttons to increase or decrease the inside geofence maximum speed. The range is 10 to 29 mph.
- (3) With the desired speed displayed, press the MODE button, which will set the inside of the geofence speed and return to the Youth Menu.
5. To exit the Youth Menu, do one of three things:
- Select the Exit Menu function from the Youth Menu.
- Hold the MODE button and exit out of the Youth Menu.
- Do not press any button for 10 seconds, which will exit out of the Options Menu.
To set the vehicle's speed outside of the geofence from the digital gauge, do the following:
1. Press and hold the MODE button to enter the Options Menu. "OPTIONS" will display on the screen for 3 seconds before showing the first menu item.
2. Select YOUTH MENU by pressing the MODE button.
3. Enter your PIN.
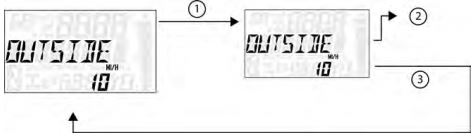
4. Select OUTSIDE from the Youth Menu by pressing the MODE button. Reference the image shown above.
- (1) Press the MODE button.
- (2) Toggle the Up and Down buttons to increase or decrease the outside geofence maximum speed. The range is 10 to 29 mph.
- (3) With the desired speed displayed, press the MODE button, which will set the outside of the geofence speed and return to the Youth Menu.
5. To exit the Youth Menu, do one of three things:
- Select the Exit Menu function from the Youth Menu.
- Hold the MODE button and exit out of the Youth Menu.
- Do not press any button for 10 seconds, which will exit out of the Options Menu.
Deleting a Geofence in the Polaris App
1. From the Vehicle Settings page, tap ADD AREA SPEED LIMIT.
2. Scroll down to your list of geofences.
3. Tap on the one you would like to delete.
4. Tap the DELETE GEOFENCE button.
5. Enable the changes to your RANGER 150 by tapping the "Push" button in the upper right corner of the Vehicle Settings page.
Helmet Aware Technology
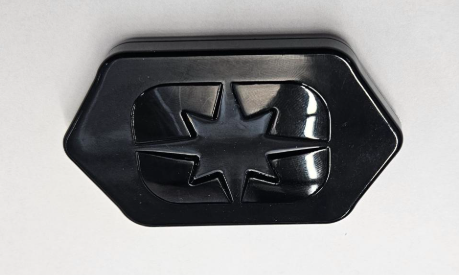
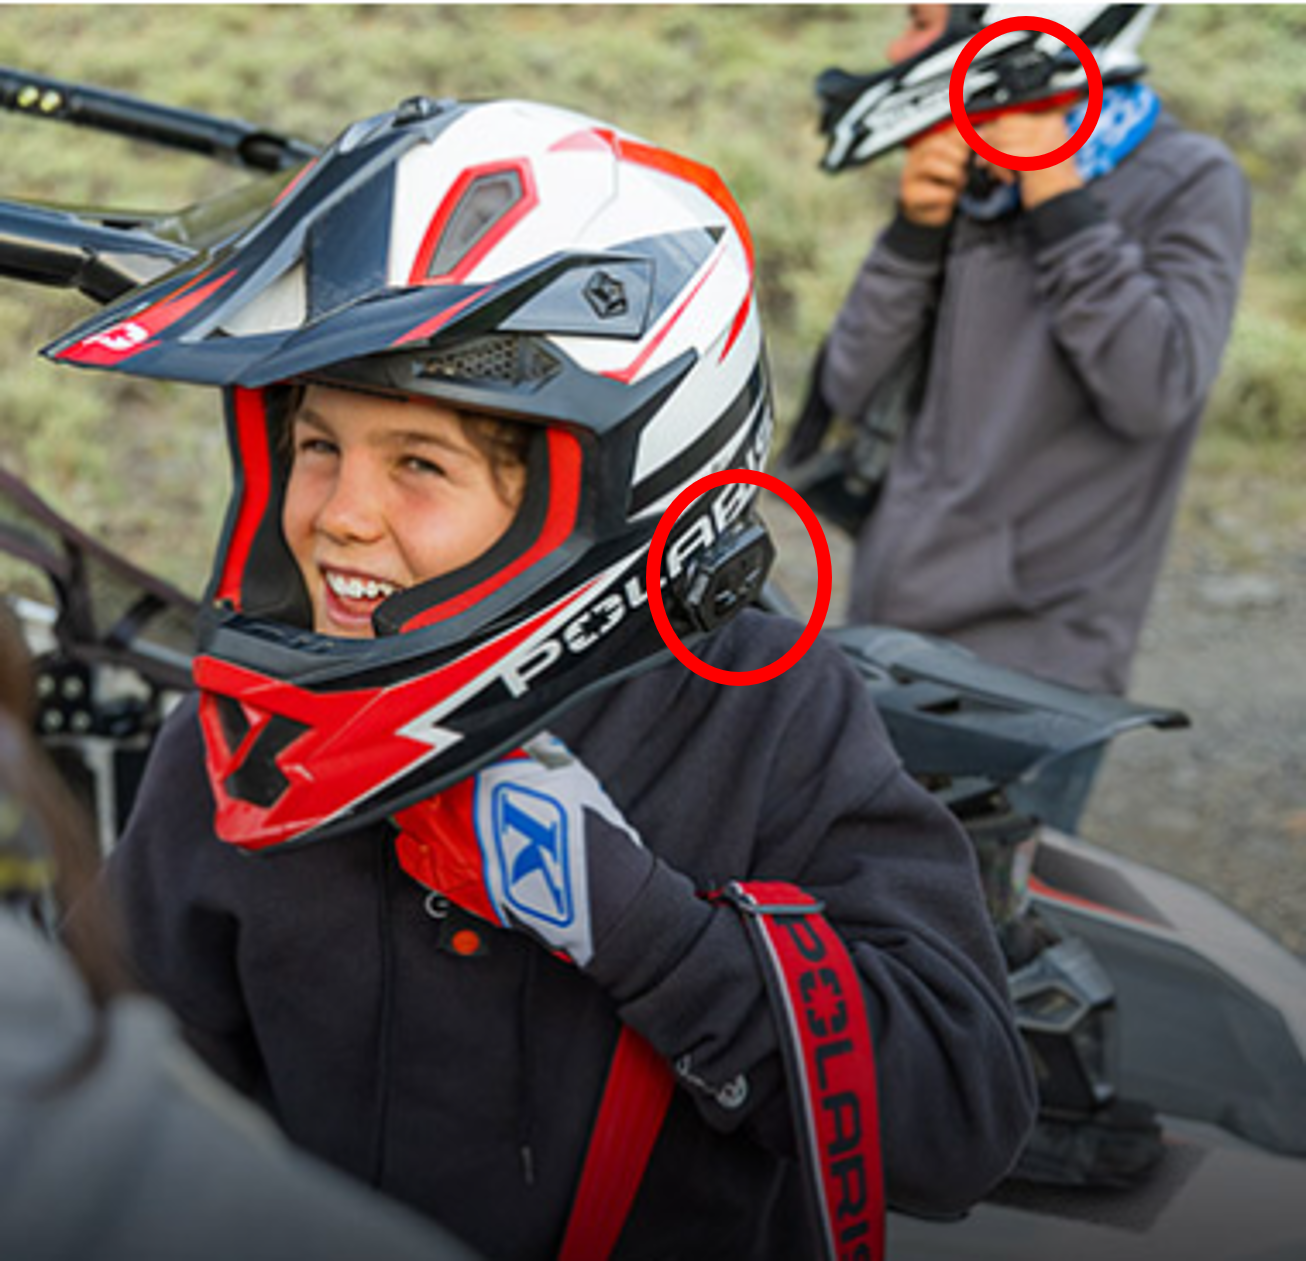
A Helmet Aware Sensor comes with the purchase of your RANGER 150 EFI. It will be located in the plastic bag with the Owner's Manual. The Helmet Aware Sensor can be adhered to the rider's helmet and can control whether or not the engine can be turned on, and/or limit the speed of the vehicle as well.
Helmet Aware Sensor (not assembled)
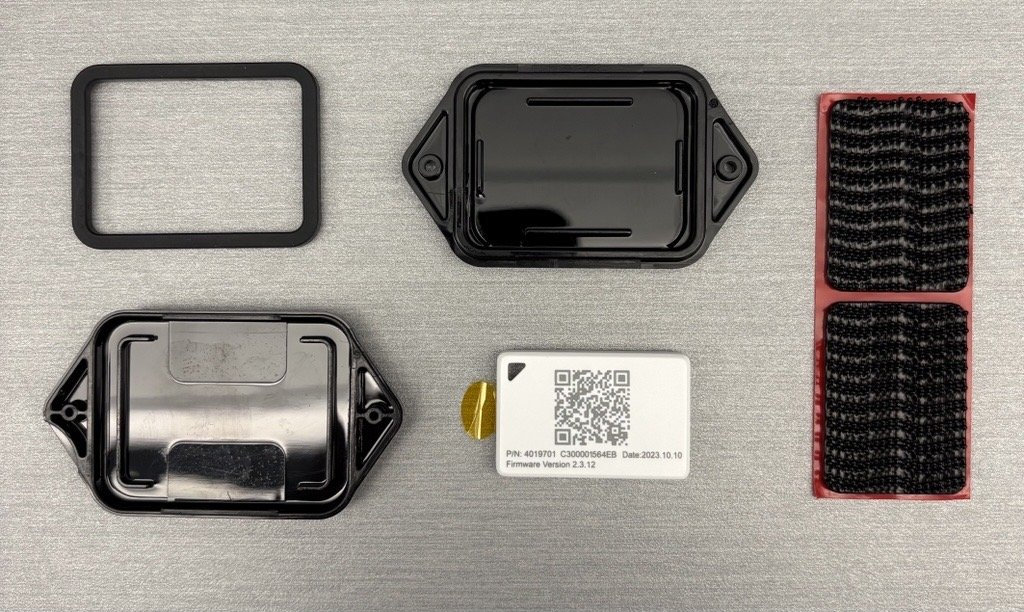
Helmet Aware Sensor (assembled)
Using the provided velcro, the Helmer Aware Sensor can be adhered to a flat portion of a youth helmet.
Note: To use all of the helmet aware features, first download the Polaris App and login to your existing Polaris account or create a new account. Turning the helmet aware feature on and off can be done through the vehicle display but the helmet not detected behavior must be selected through the Polaris App.
To turn the Helmet Aware Sensor feature ON or OFF from the vehicle display, follow these steps:
1. Press and hold the MODE button to the enter the OPTIONS menu. Note: OPTIONS will display on the screen for 3 seconds before showing the first menu item.
2. Select YOUTH MENU by pressing the MODE button.
3. Enter PIN/PASSCODE.
4. Select HELMET A from the Youth Menu by pressing the MODE button.
5. Referencing the image below, press the MODE button (1), toggle the UP/DOWN buttons to cycle through options On/Off (2), with the desired option displayed, press the MODE button which will set function and return to the Youth Menu (3).
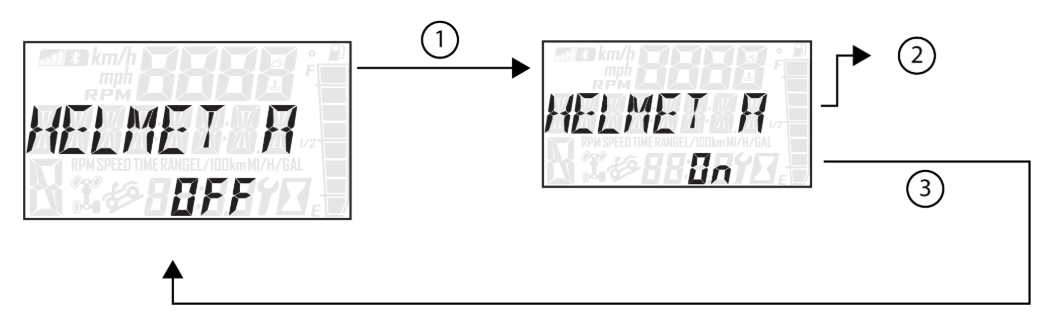
When the Helmet Aware technology is enabled the display can be configured three different ways:
- No Start - Helmet is required to start the vehicle. If the helmet is removed after starting the vehicle, vehicle will limit speed to 10 MPH and display “HELMET NOT DETECTED - LIMITING SPEED” in area 2 of the display. Note: If the vehicle display is on and the engine is not running, the message will only display “HELMET NO LONGER DETECTED - SPEED WILL BE LIMITED” in area 2.
- Limit Speed - Vehicle can start, but if helmet is not detected it will limit speed to 10 MPH and display “HELMET NOT DETECTED - LIMITING SPEED” in area 2. Note, if the vehicle display is on and the engine is not running the message will only display “HELMET NO LONGER DETECTED - SPEED WILL BE LIMITED” in area 2.
- Warning Only - Only shows warning in area 2 of the display, “HELMET NOT DETECTED”. The vehicle will still start and speed is NOT limited. Note: The default setting is “No Start”.
The Helmet Aware technology is currently configured to detect “All” helmets that contain the sensor. The display will track the helmet that is closest and switch immediately to the next available helmet if signal is lost. This allows the display to report both signal level and battery level of the helmet. It also has the ability to track specific helmets that are configured using the Polaris App.
Helmet Aware Display Notifications
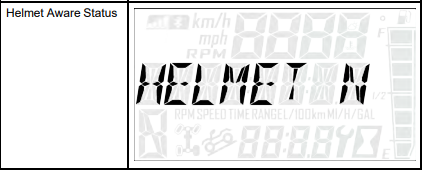
Your RANGER 150 display gauge is shown below. Messages regarding Helmet Aware Technology will occur in "Display Area 2" (2) of the vehicle's display.
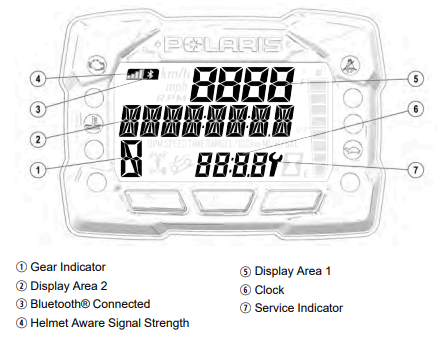
If a helmet with an installed Helmet Aware Sensor is not detected, the following message below will populate until the Helmet Aware Sensor attached to the helmet is in range of the display gauge. The signal strength of the Helmet Aware Sensor can be viewed in the upper left hand portion of the display (see "Helmet Aware Signal Strength", item 4 in the above picture).
Troubleshooting
If you cannot connect to your vehicle:
- Try turning the vehicle off, waiting 10 seconds and then turning it back on.
- Ensure Bluetooth® is enabled on your device/phone.
- In the Polaris App, try going to the map, waiting 10 seconds and then going back to the Youth screen. This will force a disconnect/reconnect.
- Try rebooting your device/phone. This will force all Bluetooth® connections to be closed.
- If you have multiple RANGER 150 vehicles, make sure the correct one is selected by swiping between them on the Youth screen.
If your geofence doesn't work:
- Ensure that the desired geofence is active and that your latest settings have been synced to the RANGER 150 EFI. Only one geofence can be active at a time.
- Geofences are accurate within the precision of the GPS built into the vehicle. This is usually within a couple meters but can vary depending on GPS signal strength. The RANGER 150 EFI only limits speed by limiting the engine, so crossing a geofence from a faster speed to a slower speed may take some time for the vehicle to slow down to the specified geofence speed limit.
If your passcode won't work:
- Try restarting both the vehicle and your device/phone.
- If that doesn't work or if you forgot your passcode, take your RANGER 150 to a Polaris Dealer to have the passcode reset.
For more information, see your authorized Polaris Dealer. Find a dealer near you with the Dealer Locator.
More information about your RANGER 150's digital gauge can be found in your Owner's Manual.
Bluetooth® is a registered trademark of Bluetooth Sig, Inc.
YouTube® is a registered trademark of Google LLC
Unless noted, trademarks are the property of Polaris Industries Inc.
© 2025 Polaris Industries Inc.


