

Your Polaris Sportsman XP 1000 S features multiple suspension adjustments. Note that it can be helpful to record your preferred settings and any adjustments you make prior to test rides. Make only one adjustment at a time when determining what settings work best for you and your riding style. Note that the adjustments listed are for stock vehicles. Accessories, rider profile and skill level all play roles in how your suspension handles. Tire pressure also will affect how the vehicle handles. All tires should be set to specification.
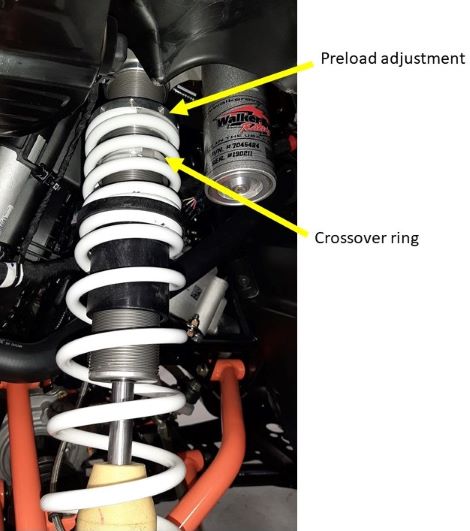
Preload Adjustments
Changes in preload affect the distribution of weight between the front and rear of the vehicle. Increasing preload on a shock will increase the ride height and transfer the weight away from the shock you are adjusting. When adjusting the front preload, always adjust the left and right shocks equally. Preload can be adjusted to rider preference for trail performance or to compensate for carrying cargo.
Front/Rear Spring Preload Adjustment
The factory setting is appropriate for nearly all riding conditions. If desired, the suspension may be adjusted to maintain vehicle clearance height when carrying loads.
The factory preload settings are 15.75 inches (40 cm) on the front suspension and 15.56 inches (39.5 cm) on the rear suspension.
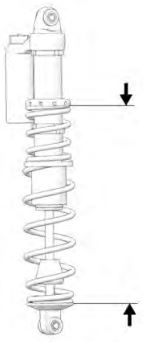
To adjust the preload:
1. Elevate the vehicle to allow the suspension to fully extend.
2. Turn the adjusting ring to the left to increase preload and ride height. Turn the adjusting ring to the right to decrease preload and ride height.
Follow these guidelines if you make adjustments to the front or rear spring preload:
- Always return the suspension to the factory setting after the load is removed from the vehicle. The increased suspension height will negatively impact vehicle stability when operating without a load.
- Always apply the same adjustment setting to both sides of the vehicle.
- Do not increase the spring preload by more than 1 inch (25.4 mm) over the factory setting.
- When decreasing preload, make sure at least two turns of preload are holding the spring between the retainer on the top of the shock and the threaded spring preload adjuster nut on the shock body. Failure to do so could cause the retainer to fall off when the suspension is fully extended.
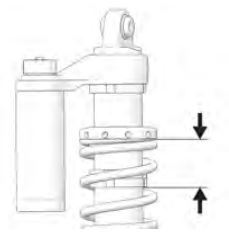
Crossover Ring Adjustment
The crossover ring factory setting is 2.13 inches (5.4 cm) on the front suspension.
Your shock is made up of two springs. The first spring has a softer spring rate for the initial compression. The second one has a stiffer spring rate to keep your vehicle from bottoming out. The crossover ring separates the two and determines when the spring rate changes.
To increase stiffness, move the crossover rings down. To decrease stiffness, move the crossover rings up.
To adjust the crossover rings, do the following:
1. Elevate the vehicle to allow the suspension to fully extend.
2. Using a screwdriver, unlock the crossover adjustment ring.
3. Adjust the crossover ring to the desired location.
4. Lock the crossover adjustment ring.
Damping Adjustment
Compression damping adjustments are a matter of rider comfort.
Increased damping means a stiffer ride, while decreased damping means a softer ride. A stiffer ride means the rider will absorb more of the energy created by the impact. On a softer ride, the suspension absorbs more of the impact energy.
Front/Rear Shock Compression Adjustment
Always adjust the clicker at least one click below full stiff (full clockwise) or shock damage will occur. The factory clicker settings are 8 clicks from full stiff on both the front and rear suspensions.
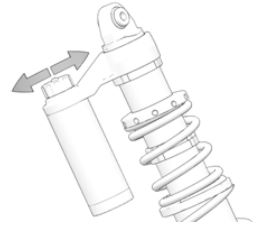
To adjust the compression damping, do the following:
1. Turn the clicker clockwise to increase compression damping.
2. Turn the clicker counterclockwise to decrease compression damping.
For more information, see your authorized Polaris Dealer. Find a dealer near you with the Dealer Locator.
Maintenance tips, procedures and specifications can be found in your Owner's Manual.
To find diagrams and replacement part numbers, use the online parts catalog.
Unless noted, trademarks are the property of Polaris Industries Inc.
© 2022 Polaris Industries Inc.


