

| Required Tools and Supplies | ||
| T40 TORX® Socket | Ratchet | 5/32-Inch (4mm) Drill Bit |
| Drill | Pliers and Adjustable Pliers | Side Cutters |
| Pick | Panduit Strap | Torque Wrench |
| Shop Rags | Safety Glasses | Nitrile Gloves |
To learn more about tools, read the Tools and Fasteners Guide.
The heated driver seat for Polaris Matryx snowmobiles is part number 2884937. View the instructions for this kit by searching the Polaris Accessory Installation Instruction Site. Always wear safety glasses and nitrile gloves when servicing your Polaris snowmobile.
To install the heated driver seat on your Matryx snowmobile, follow these steps:
1. Park the snowmobile on a flat surface and remove the key.
2. Remove both side panels by turning the three quarter-turn latches. Pivot the panels away from the sled and pull out to remove.
3. Disconnect the two hood latches.
4. Lift the hood up slightly to gain access to the connector underneath.
5. Disconnect the connector, and remove the hood from the sled.
6. If your snowmobile is equipped with a passenger seat, unplug and remove the passenger seat.
7. Remove the seat by turning the quarter-turn latch at the rear of the seat. Pull the seat back and lift it up to remove.
8. Use a T40 TORX® socket to remove the two fasteners that secure the console and lower intake plenum to the over-structure.
9. Use a pliers to remove the two push-pin rivets that secure the front of the console to the plenum.
10. Use a T40 TORX® socket to remove the two fasteners securing the lower portion of the console.
11. Remove the push-pin rivet on the right side of the console with a pliers.
12. Remove the clutch spreader tool on the left side of the console.
13. Continue by removing the fuel cap. Ensure no dirt or debris enters the fuel tank.
14. Remove the plastic fuel filler neck nut with an adjustable pliers.
15. Pull out the sides of the console and lift up the center of the console to disconnect the key switch connector from the key switch with a pick.
16. Carefully pivot the console over to the right side of the sled with the starter rope still attached.
17. Before continuing, reinstall the fuel cap to prevent dirt or debris from falling into the tank.
18. Remove the cap from the driver-side heater switch.
19. Connect the main harness connector of the heated seat to the driver seat heater switch connector on the main harness.
20. Carefully route the seat harness upward, align the retention location with the main harness, and secure the seat harness to the main harness with a Panduit strap. Remove any excess strap with a side cutters.
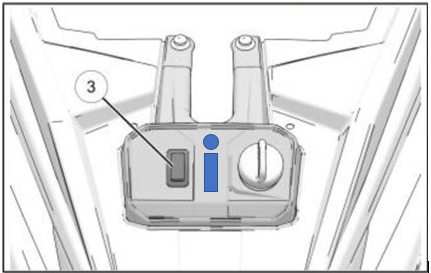
21. Flip the console over, locate the witness mark and drill around the mark. Use a 5/32-inch (4mm) drill bit.
NOTE: If your snowmobile is equipped with a tether, the shown witness marks will be occupied. Use the middle witness marks in between the tether and ignition switch shown below in blue:
22. Once drilling is complete, remove the remaining plastic with a utility knife. Use a deburring tool to clean up the edges until the heated seat switch fits firmly into the hole.
23. Begin reassembly by removing the fuel cap, ensuring no dirt or debris enters the fuel tank.
24. Carefully pivot the console back into position.
25. Connect the heated set harness to the heated seat switch.
26. Continue by reconnecting the main harness key switch connector to the key switch.
27. Slide the console into place, ensuring the intake screens are fully seated through their mounting locations.
28. Reinstall both the plastic fuel filler nut and fuel cap.
29. Reinstall the clutch spreader tool on the left side.
30. Install the push-pin rivet on the right side.
31. Install the two fasteners on the console. Torque to 71 in-lbs (8 Nm).
32. Install the two push-pin rivets that secure the front of the console to the lower intake plenum.
33. Reinstall the two fasteners that secure the console and plenum to the over-structure. Torque to 71 in-lbs (8 Nm).
34. Reinstall the hood panel, ensuring the tabs in front are properly engaged.
35. Reconnect the connector underneath, and verify it is secure.
36. Continue by securing the two hood panel latches.
37. Reinstall both side panels by inserting the upper tab and pivoting in to engage the lower tab.
38. Latch the three quarter-turn latches to secure each panel.
39. Plug in the heated seat harness connector to the chassis harness connector.
40. Align the groove on the seat with the stem on the sled, and secure it with the quarter-turn latch.
41. If desired, reinstall the passenger seat and reconnect the harness.
42. Check the heated seat switch for proper operation.
For more information, see your authorized Polaris Dealer. To find a dealer near you, use the Dealer Locator.
Maintenance tips, procedures and specifications can be found in your Owner's Manual.
To find diagrams and replacement part numbers, use the online parts catalog.
AC Delco® is a registered trademark of GENERAL MOTORS LLC
Makita® is a registered trademark of Makita Electric Works, Ltd.
TORX® is a registered trademark of Acument Intellectual Properties, LLC
WALKER EVANS RACING® is a registered trademark of Walker Evans Enterprises Incorporated
YouTube® is a registered trademark of Google LLC
© 2022 Polaris Industries Inc.


