

The following information applies to the INDY EVO, RMK EVO, 550 INDY 121, 550 INDY 144, 550 INDY LXT, 550 INDY ADVENTURE, 550 VOYAGEUR and 600 INDY 121 models.
Your Polaris snowmobile’s suspension can be adjusted to fit your individual riding style. For full details on adjustments, see your Owner’s Manual.
You first should ride your vehicle in various terrain to fully experience the existing suspension settings before making adjustments. After getting a feel for the factory settings, you can alter it to suit your preferences. Settings will vary from rider to rider, depending on rider weight, vehicle speed, riding style and trail conditions. Polaris recommends starting with factory settings and then customizing each adjustment individually to suit rider preference. The snowmobile should be methodically tested, one change at a time, under the same conditions — trail and snow conditions, vehicle speed, riding position, etc. — after each adjustment until the best ride is achieved.
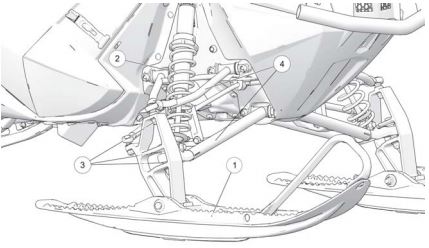
Independent Front Suspension (IFS)
Factory settings, combined with user adjustments to the rear suspension, should be all that’s necessary to provide the best riding experience for most riders. If all rear shock spring adjustments have been exhausted and rider weight is at the very high or very low weight range for the stock spring, additional adjustments are possible to the Independent Front Suspension (IFS).
Break in the front suspension for about 150 miles (240 km) before making adjustments to the IFS.
The IFS is made up of skis (1), front shocks and springs (2), rod ends (3) and A-arms (4).
IFS adjustments can be made to the front shock spring preload, optional springs and optional shock valving.
Increasing spring preload will increase ski-to-ground pressure. Decreasing spring pressure will decrease ski-to-ground pressure.
Important: Always perform shock spring preload adjustments with the weight of the vehicle removed from the shock and with the shock at full extension. When adjusting, be sure the springs on both the left and right sides of the machine are at the same adjustment.
To change shock spring preload, grasp the spring retainer and rotate it.
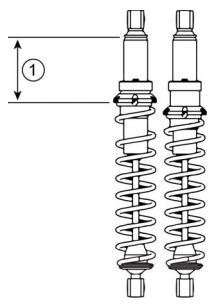
| Initial IFS Preload Setting (from body end to spring (1)) | ||
| Model Year | Shock Type/Model | Initial IFS Preload Setting (From body end to spring (1)) |
| 2017 2018 | Ryde FX shocks (144 Models) | 4.375 in (11.1 cm) |
| 2017 2018 2022 | Ryde FX shocks (155 Models) | 4.75 in (12.1 cm) |
| 2019 2022 | 121 Models (Except EVO) | 10.40 in (26.4 cm) |
| 2019 2022 | 155 Models | 10.14 in (25.7 cm) |
| 2019 2022 | EVO and EVO RMK | 7.94 in (20.2 cm) |
| 2020 2021 | Voyageur 144 Models | 4.125 in (10.5 cm) |
| 2020 2021 | 121 and 144 Models | 4.375 in (11 cm) |
Increasing the spring preload too much may adversely affect the handling of the snowmobile and the performance of the suspension. Never exceed 1 inch (2.54 cm) of preload beyond the factory settings.
When decreasing preload, make sure at least two turns of preload are holding the spring between the retainer on the top of the shock and the threaded spring preload adjuster nut on the shock body. Failure to do so could cause the retainer to fall off when the suspension is fully extended.
See your Polaris Dealer for other spring options.
Some shocks can be revalved if spring preload alone isn’t sufficient and further adjustment is desired to control suspension stiffness. Changing shock valving requires special tools and a sound knowledge of mechanical theory, tool use and shop procedures to perform the work safely and correctly. Shocks contain high-pressure nitrogen gas. Use extreme caution when handling high-pressure service equipment. Polaris recommends that this work be performed by a dealer.
Rear Suspension Adjustments
Each rear suspension can be adjusted to suit rider preference and deliver excellent performance for a given set of conditions. However, all suspension designs and adjustments involve a compromise or trade-off. For example, a suspension set up for snowcross racing would provide a very stiff ride on the trail. A suspension set up for trail riding would bottom out harshly on a snowcross course.
Refer to the suspension setup label on your snowmobile or your Polaris Dealer can provide the initial setup information. Additional adjustments can be made after the initial setup. Make adjustments to one area at a time so you can evaluate the change. For further assistance, see your dealer.
Suspension Performance Tips
- Rider weight usually determines the position at which the spring preload should be set. However, this may vary with riding style. With a little experimentation, each rider can find a preferred setup. These adjustments are easy to make, involve very little time or effort and greatly affect the ride.
- In deep snow, a new rail slide will offer improved performance over a worn rail slide. It also can improve top speed.
- When riding on ice or hard-packed snow, adding a set of bogie wheels to the rail may enhance the snowmobile’s performance. Bogie wheel kits are available from your dealer.
- Polaris offers track kits for improved flotation in deep snow. See your dealer for assistance.
- Keep the suspension pivot points lubricated. This will reduce moisture and rust buildup and ensure proper function of the suspension components. Grease rear suspension pivots before adjusting the rear suspension.
Track Tension
Track adjustment is critical for proper handling. Always maintain correct tension and alignment.
Rear Track Shock Spring
550 INDY Models
Measure the rear track shock spring and length and adjust to the appropriate length based on rider weight. Include passenger weight (if applicable) and all riding gear, accessories and cargo weight in the calculation. Only allow a passenger to ride on models equipped with a passenger seat.
1. Securely elevate and support the rear of the snowmobile to remove the weight from the suspension.
2. Use a tape measure to measure the spring-installed length between the two spring retainers.
3. Refer to the chart on the next page to determine the correct spring length for rider weight. If adjustment is needed, clear away any snow or ice trapped within the spring or threads.
4. Using a spanner wrench, rotate the spring to adjust length. Never adjust a spring beyond the maximum length shown in the chart. Adjusting beyond maximum adjustment will cause the spring to bottom and result in damage to your rear suspension.
Adjust the rear track shock spring per the chart below.
| Rear Track Shock Spring (RTSS) Set-Up (Standard Spring) Measure spring length with suspension off the ground | ||||
| Rider Weight (Including all riders, gear, cargo & accessories) | Model | Installed Spring Length | ||
| Shaded cells below indicate factory settings | ||||
| <160 lbs | <73 kg | 550 INDY Adventure/Voyageur/LXT | 11.125 in | 28.2 cm |
| 550 INDY 144 | ||||
| 160-220 lbs | 73-100 kg | 550 INDY Adventure/Voyageur/LXT | 10.75 in | 27.3 cm |
| 550 INDY 144 | 10.5 in | 26.7 cm | ||
| 220-280 lbs | 100-127 kg | 550 INDY Adventure/Voyageur/LXT | 10.5 | 26.7 cm |
| 550 INDY 144 | 10.125 in | 25.7 cm | ||
| 280-340 lbs | 127-154 kg | 550 INDY Adventure/Voyageur/LXT | 10.125 in | 25.7 cm |
| 550 INDY 144 | 9.75 in max. adjustment | 24.7 cm max. adjustment | ||
| 340-360 lbs | 154-163 kg | 550 INDY Adventure/Voyageur/LXT | 9.875 in max. adjustment | 25 cm max. adjustment |
EVO RMK Models
| Rear Track Shock Spring (RTSS) Set-Up | ||||
| Rider Weight (Including all riders, gear, cargo & accessories) | Model | Installed Spring Length | ||
| Shaded cells below indicate factory settings | ||||
| <160 lbs | <73 kg | EVO RMK | 9.5 in | 24.1 cm |
| 160-220 lbs | 73-100 kg | EVO RMK | 9.12 in | 23.2 cm |
| 220-280 lbs | 100-127 kg | EVO RMK | 8.75 in | 22.2 cm |
| *RMK EVO maximum adjustment is 8.5 in (21.6 cm) | ||||
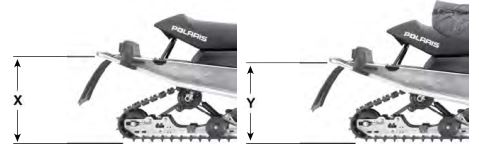
Initial Spring Preload Setting (SAG Method)
To set up the rear suspension torsion spring preload, measure the distance between the ground and rear bumper. This is measurement X.
Take the first measurement with no rider and with the rear suspension at full extension. The rear bumper may need to be lifted upward slightly to fully extend the suspension.
Next, have the rider drop down hard on the seat and bounced up and down several times, collapsing the rear suspension. With the rider seated, measure the distance between the ground and the rear bumper at the exact location used for measurement X. This is measurement Y. To determine sag, commonly referred to as ride-in, subtract measurement Y from X (sag = X-Y). If the measured sag is incorrect, adjust the rear torsion spring preload.
For the 121 models, the recommended sag is 3-4 inches (7.5-10 cm). For the INDY EVO, the recommended sag is 1.5-2.5 inches (3.8-6.3 cm).
For 155 models, the recommended sag is 4 inches (10.2 cm). This is only an initial setup, and final spring preload may vary based on rider preference and riding conditions. Accessory springs with a higher load rating are available for some models. See your local Dealer for availability.
| Suspension | Recommended SAG | Adjustment |
| INDY 121 | 3-4 in (7.5-10 cm) | Torsion Spring Preload |
| INDY 155 | 4 in (10 cm) | Torsion Spring Preload |
| INDY EVO | 1.5-2.5 in (3.8-6.3 cm) | Torsion Spring Preload |
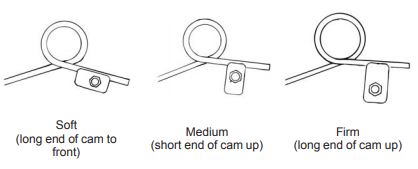
Torsion Spring Preload
To adjust rear torsion spring preload, rotate the three-position cam using the engine spark plug tool. Adjustment is easiest when the cam is rotated from low to medium and then to high. Rotating directly from low to high will require significantly more effort.
Different rate torsion springs are available if a firmer ride is desired. See your dealer for more information.
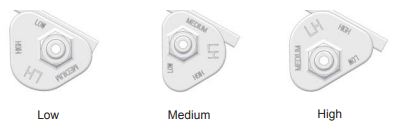
For 155 models, the three-position cam can be seen below. Different rate torsion springs are available if a firmer ride is desired. See your dealer for more information. The following is a guideline to be used for initial suspension setup. Your setup may vary based on your desired riding style.
Limiter Strap Position
Ski pressure is set at the factory to deliver the optimum balance between ride and handling. If a rider prefers more ski pressure for improved steering performance, adjustments can be made to the front limiter straps (1). Tighten the straps to increase ski pressure. Loosen the straps to reduce ski pressure.
550 INDY 121 AND EVO limiter strap:
600 INDY 121 limiter straps:
1. Remove the nuts and flat washers from the upper limiter strap.
2. Relocate the strap to the desired position.
3. Reinstall the nuts and washers. Tighten securely.
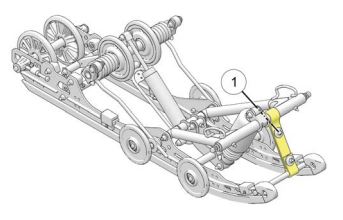
Suspension Coupling (121 Models Only)
There are two torque arms that control the movement of the rail beam on rear suspensions. Prior to the advent of suspension coupling, these torque arms could move independently of each other. Rear suspension coupling links the movement of the front and rear torque arms to each other.
Front to rear coupling and the Front Rear Scissor Stop (FRSS) couples the movement of the front torque arm with the rear torque arm and limits the amount of independence between the movement of the front torque arm and rear torque arm.
When hitting a bump, the front torque arm starts to compress. The FRSS links the movement to the rear torque arm, causing it to compress and raise the rear suspension up as one and allowing the suspension to hit the bump only once and reducing kickback.
The factory setting usually is adequate for all riders and conditions.
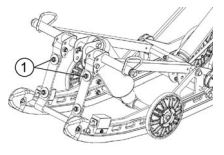
Rear to front coupling and the Rear Rear Scissor Stop (RRSS) couples the movement of the rear torque arm with the front torque arm and limits the amount of independent movement between the rear torque and the front torque arm.
Adjusting the RRSS either allows more weight to transfer to the rear for more traction or allows less weight to transfer to the rear, resulting in an improved cornering performance. An adjustment dot is located on the RRSS. This dot is on the longest end of the scissor stop.
Moving the RRSS to a higher position will have the following effects on the suspension:
- Reduced weight transfer.
- Improved chatter bump ride.
- Improved cornering performance.
- Increased load carrying capacity on 2-up sleds.
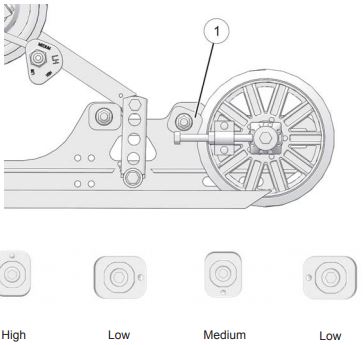
The preferred method for controlling weight transfer during acceleration is by adjusting the RRSS (1). The factory setting is the best for most trail riding conditions.
To decrease weight transfer under acceleration — for improved cornering — rotate the RRSS to a higher position.
To increase weight transfer or ski lift during acceleration, rotate the RRSS to a lower position.
Your dealer can help you with initial setup and additional setup instructions to help you achieve your optimum ride. A scissor stop tool is available from your dealer.
For more information, see your authorized Polaris Dealer. To find a dealer near you, use the Dealer Locator.
Maintenance tips, procedures and specifications can be found in your Owner's Manual.
To find diagrams and replacement part numbers, use the online parts catalog.
Unless noted, trademarks are the property of Polaris Industries Inc.
© 2022 Polaris Industries Inc.


