

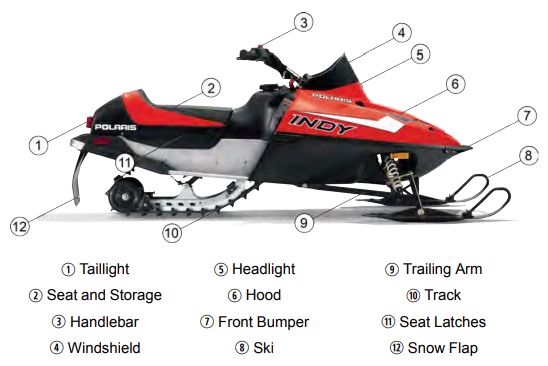
The Polaris 120 INDY is designed as the ideal first snowmobile for youth riders.
Basics
Starting the Engine
To start the engine of your 120 INDY:
1. Pull the engine stop switch up to the RUN position.
2. Do not use the choke when starting a warm engine. If the engine is cold, pull the choke lever completely out to the FULL ON position. Caution: Do not apply throttle while starting.
3. Grasp the starter handle and pull slowly until the recoil engages and then pull abruptly to start the engine. Notice: Extending the starter rope too far or allowing it to snap back into the housing will cause damage to the recoil assembly. Do not extend the starter rope to its maximum length, and do not drop the rope handle during starting.
4. If the engine slows or stops, position the choke knob halfway in.
5. Apply the brakes and vary the engine RPM slightly with the throttle to aid in warm-up. When the engine idles smoothly, push the choke knob all the way in. Notice: To prevent excessive wear on the clutch components, don’t engage the clutch while performing the warm-up.
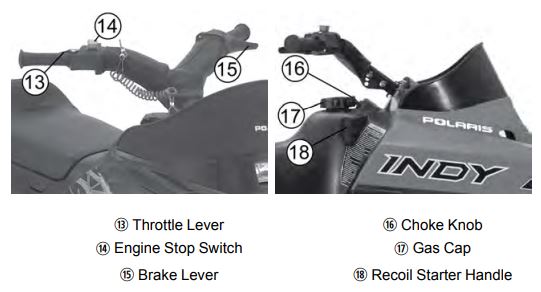
Throttle and Brake
The throttle lever makes the snowmobile go forward when pressed with the rider’s thumb. When the throttle lever is squeezed, the track turns. Always make sure the throttle lever does not stick prior to driving the snowmobile.
To make the snowmobile slow down or stop, the brake lever is squeezed toward the handlebar. Always take your thumb off the throttle lever when you squeeze the brake lever.
Before using the snowmobile, check for proper operation of the steering system. Manually turn the skis completely to the right and to the left. If difficulty is encountered, check for ice and snow buildup that may be obstructing the steering linkage. Make sure all greaseable components are properly lubricated.
Regulating Speed
Adults can regulate the speed and acceleration of a 120 INDY. This can be done using the governor spring.
Move the governor spring (1) to hole (3) for maximum performance and the highest-available speed.
Move the governor spring to hole (2) for minimum performance and the lowest-available speed.
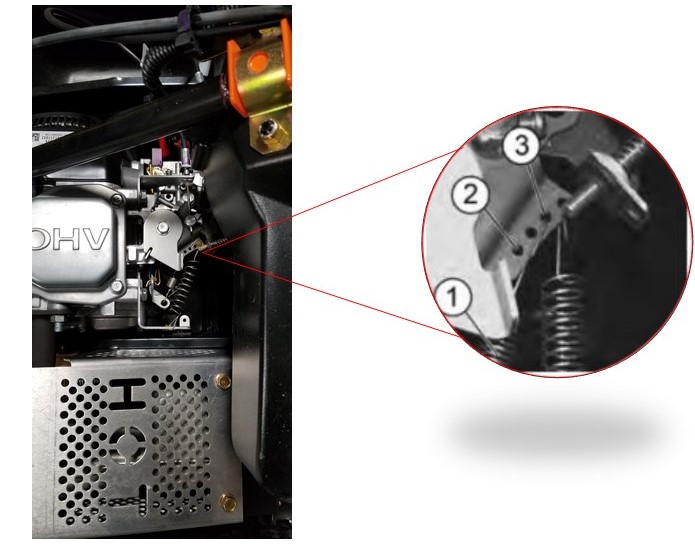
Always perform governor spring adjustments when the engine is cool. Hot engine components can cause serious burns to skin.
Stopping the Engine
There are two ways for a rider to stop the engine. The first is to push down the stop switch (1). The second is to pull the strap off the tether switch (2).
When the engine is running, push the engine stop switch down to stop the engine. Pull the stop switch up before trying to start the engine again.
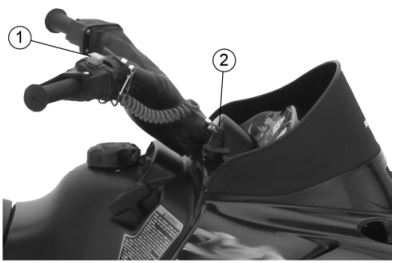
A rider always should have the tether strap attached to their body and the switch (1) on their snowmobile. If the rider falls off the snowmobile, the tether strap will pull away from the switch and the engine will stop.
When attaching the strap to the rider, it can be clipped to a loop on their clothing (2) or wrapped around their right wrist (3) with the clip attached to the strap.
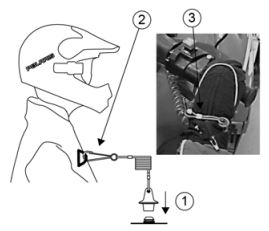
No ride should take place without the tether strap attached to the rider’s body and to the snowmobile. Be careful not to let the cord get tangled around the handlebars or any part of the rider’s body.
Handlebar Adjustment
To adjust your handlebars, follow these steps:
1. Slide the handlebar pad upward to access the adjuster bolts. If additional room is required, unzip one of the handlebar pad zippers and roll the pad to the side.
2. Remove the upper flange nut and carriage bolt (1).
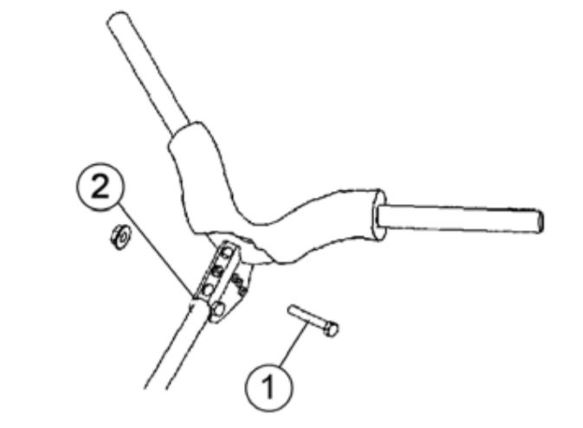
3. Loosen the lower flange nut (2) only enough so the bracket can move freely.
4. Position the handlebar to the desired height.
5. Reinstall the upper carriage bolt and flange nut.
6. Torque both flange nuts to 15 to 17 ft-lbs (20-23 Nm).
7. Reinstall the handlebar pad.
Storage
When the engine is stopped, the seat cushion can be removed to store items under the seat. Push the two seat latches in and pull the seat up to remove it. Always put the seat back on and make sure the latches are locked in place before riding.
Lights
The headlight and taillight are always on when the engine is running. They will help others see the snowmobile during the daylight. The headlight is not meant to be strong enough to help a rider see in the dark. The 120 INDY should only be operated in the daylight.
Fuel
When refueling, use either leaded or unleaded gasoline with a minimum pump octane number of 87=(R+M)/2 octane. Do not use E-85 fuel.
Warning: Gasoline is highly flammable and explosive under certain conditions.
- Always exercise extreme caution whenever handling gasoline.
- Always refuel with the engine stopped and outdoors or in a well-ventilated area.
- Do not smoke or allow open flames or sparks in or near the area where refueling is performed or where gasoline is stored.
- Do not overfill the tank. Do not fill the tank neck.
- If gasoline spills on your skin or clothing, immediately wash it off with soap and water and change clothing.
- If you get gasoline in your eyes or if you swallow gasoline, see your doctor immediately.
- Never start the engine or let it run in an enclosed area. Engine exhaust fumes are poisonous and can cause loss of consciousness or death in a short time. Operate this vehicle only outdoors or in a well-ventilated area.
- Turn off the fuel valve whenever the vehicle is stored or parked.
Youth riders and an adult should review the safety tips and pre-ride inspection procedures outlined in the 120 INDY Owner’s Manual before riding. The Owner’s Manual also contains complete maintenance instructions and procedures.
Review snowmobile safety tips before operating your 120 INDY. To learn more, view the 2014-2023 120 INDY Orientation and 2014-2023 120 INDY Pre-Ride Inspection videos.
Unless noted, trademarks are the property of Polaris Industries Inc.
© 2022 Polaris Industries Inc.


