

If a belt fails on your Polaris RZR 800, RZR 4 800, RZR S 800, RZR S, RANGER RZR or RANGER RZR S, always clean any debris from the PVT intake and outlet duct and from the clutch and engine compartments when replacing the belt. Failure to remove all debris when replacing the belt could result in vehicle damage, loss of control and severe injury or death.
The replacement belt is part number 3211113 for EBS models and part number 3211162 for non-EBS models. Allow hot components to cool before changing the belt on your RZR. When installing a new belt, position the belt so the part number can be easily read.
Belt slip is responsible for creating excessive heat that destroys belts, wears clutch components and causes outer clutch covers to fail. Switch to low range while operating at slower speeds to extend the life of the PVT components (belt, cover, etc.).
Note that belt change procedures are the same for two-seat and four-seat models.
1. Remove the seat and the under-seat storage box.
2. Remove the clutch cover screws with an 8mm Allen socket and open the clutch cover. Remove all debris wrapped in and around the PVT system.
3. Remove all debris from the entire clutch air duct passage.
4. Check for signs of damage to seals on the transmission and engine. See your Polaris Dealer promptly for service if any seals appear to be damaged.
5. On standard non-EBS models, place the transmission in PARK and push down on the belt firmly to open the clutch sheaves. Then lift upward on the belt while pulling it out and down over the driven clutch outer sheave.
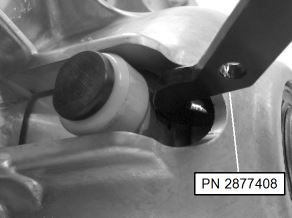
On EBS models, insert the belt removal tool into the driven clutch as shown below. Rotate the tool toward the clutch to open the sheaves. Walk the belt out of the driven clutch and drive clutch. Remove the belt from the vehicle.
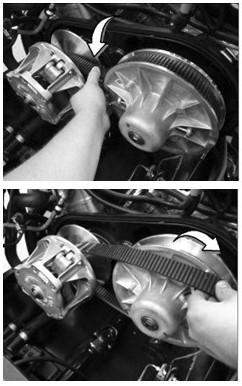
6. On standard non-EBS models, loop the belt over the drive clutch and over the driven sheave. While pushing down on the top of the belt, turn the back or moveable driven sheave clockwise. The belt should be able to be pushed down into and between the sheaves. Continue rotating the driven clutch and belt clockwise until the belt is fully installed.
On EBS models, with the belt removal tool installed, loop the belt over the drive clutch and over the driven clutch. Rotate the driven clutch and walk the belt into the clutch. Remove the belt removal tool from the driven clutch. Rotate/spin the driven clutch and belt approximately five to seven times to properly seat the belt in the driven clutch.
For more information, see your authorized Polaris Dealer. Find a dealer near you with the Dealer Locator.
Additional maintenance tips, procedures and specifications can be found in your Owner's Manual.
To find diagrams and replacement part numbers, use the online parts catalog.
Unless noted, trademarks are the property of Polaris Industries Inc.
© 2022 Polaris Inc.


