

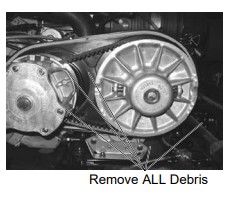
If a belt fails, always clean any debris from the duct and from the clutch and engine compartments when replacing the belt.
Warning: Failure to remove all debris when replacing the belt could result in vehicle damage, loss of control and severe injury or death.
Always wear safety glasses and nitrile gloves while servicing your Polaris RANGER. To inspect or replace the drive belt on your RANGER 800 follow these steps.
Non-EBS Drive Belt
To remove the belt, do the following:
1. Park the vehicle on a level surface. Block the wheels to prevent vehicle movement and place the transmission in NEUTRAL.
2. Remove the seat and storage container to gain access to the clutch cover.
3. Remove the PVT air outlet duct hose and the clutch cover bolts with a 10mm socket.
4. Remove the clutch cover. Also remove all debris wrapped in and around the PVT system.
5. Mark the drive belt direction of rotation so that it can be installed in the same direction.
6. To remove the drive belt, put transmission in gear and apply the brake. Pull upward and rearward on the belt to open the driven clutch sheaves.
7. Pull out and down on the drive belt to slip over the driven clutch outer sheave.
8. Slip the belt over the drive clutch outer sheave and remove the belt from the vehicle.
9. Inspect the belt for hourglassing, loose cords, missing cogs, cracks, abrasions, thin spots, or excessive wear. Belts with thin spots, burn marks, etc., should be replaced to eliminate noise, vibration, or erratic PVT operation. Replace the belt if necessary. The drive belt is part number 3211162. Find the correct belt for your RANGER 800 by using the parts catalog.
10. Clean out the inside of the clutch covers thoroughly.
If reinstalling the belt, make sure it is installed in the same direction as it was removed. To install the belt, follow these steps:
1. Loop the belt over the drive clutch and driven sheave.
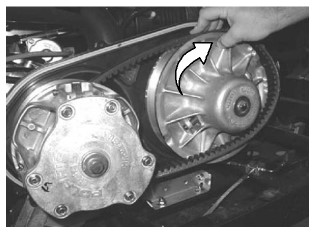
2. While pushing down on top of the belt, turn the back or moveable driven sheave clockwise.
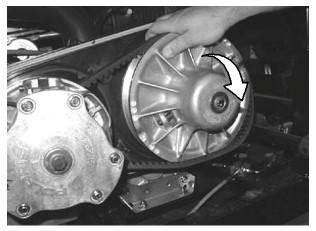
3. The belt should then be able to be pushed down into and between the sheaves.
4. Install the outer clutch cover and screws. Torque screws to 45 to 50 in-lbs (5.5 Nm).
5. Reinstall the PVT air outlet duct hose.
6. Reinstall the storage container and seat.
EBS Drive Belt
1. Park the vehicle on a level surface. Block the wheels to prevent vehicle movement and place the transmission in NEUTRAL.
2. Remove the seat and storage container to gain access to the clutch cover.
3. Remove the PVT air outlet duct hose and the clutch cover bolts with a 10mm socket.
4. Remove the clutch cover.
5. Mark the drive belt direction of rotation so that it can be installed in the same direction. Note: The belt is normally positioned so that part numbers are easily read.
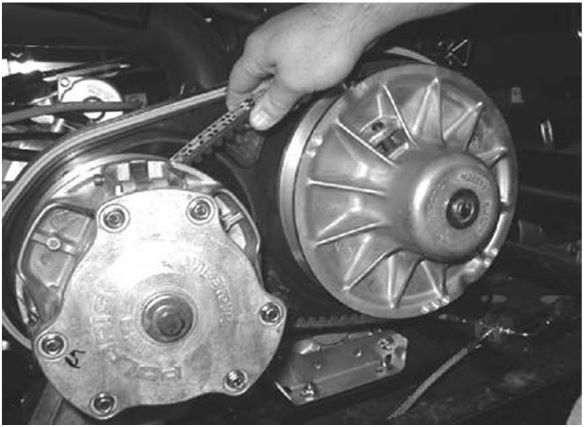
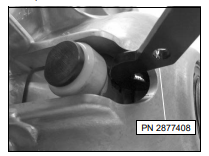
6. Insert the belt removal tool (PN 2877408) into the driven clutch as shown. This tool is included in the vehicle's tool kit. Note: Make sure the tool is square with the moveable sheave surface of the driven clutch.
7. Rotate the tool toward the clutch to open the sheaves.
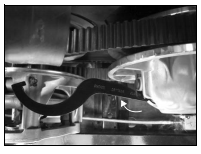
8. Walk the belt out of the driven clutch and drive clutch. Remove the belt from the vehicle.
9. Inspect the belt for hourglassing, loose cords, missing cogs, cracks, abrasions, thin spots, or excessive wear. Belts with thin spots, burn marks, etc., should be replaced to eliminate noise, vibration, or erratic PVT operation. Replace the belt if necessary. The belt is part number 3211162. Find the correct belt for your RANGER 800 by using the parts catalog.
10. Clean out the inside of the clutch covers thoroughly.
If reinstalling the belt, make sure it is installed in the same direction as it was removed. To install the belt, follow these steps:
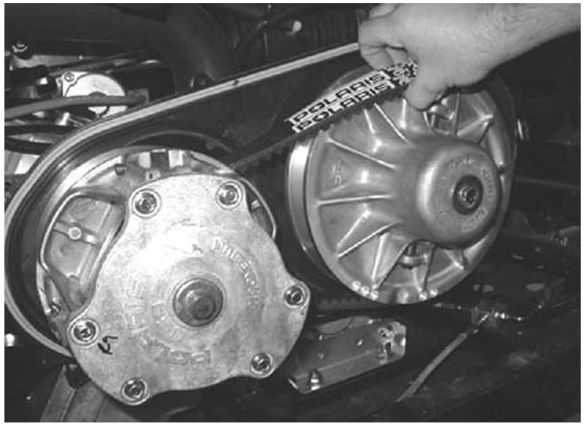
1. With the belt removal tool (part number 2877408) installed, loop the belt over the drive clutch and over the driven clutch.
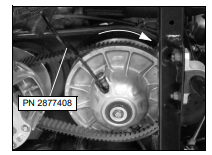
2. Rotate the driven clutch and walk the belt onto the clutch.
3. Remove the belt removal tool from the driven clutch.
4. Rotate the driven clutch and belt 5-7 times to properly seat the belt in the driven clutch.
5. Install the outer clutch cover and eight cover screws with a 10mm socket. Torque screws to 45 to 50 in-lbs (5.5 Nm).
6. Reinstall the PVT air outlet duct hose.
7. Reinstall the storage container and seat.
For more information, see your authorized Polaris Dealer. Find a dealer near you with the Dealer Locator.
Maintenance tips, procedures and specifications can be found in your Owner's Manual.
To find diagrams and replacement part numbers, use the online parts catalog.
Unless noted, trademarks are the property of Polaris Industries Inc.
© 2022 Polaris Industries Inc.


