BREAK-IN PERIOD FOR GAS VEHICLES
The break-in period for your new vehicle is the first 25 hours of operation, or the time it takes to use the first two full tanks of gasoline. No single action on your part is as important as a proper break-in period. Careful treatment of a new engine will result in more efficient performance and longer life for the engine. Perform the following procedures carefully.
Notice: Excessive heat build-up during the first 3 hours of operation will damage close-fitted engine parts and drive components. Do not operate at full throttle or high speeds during the first 3 hours of use. Use of any improper oils may cause serious engine damage. Polaris Premium 4 Synthetic Oil is specifically formulated for your 4-cycle engine.
For more on a proper break-in, listen to the Break In That Off-Road Vehicle episode of the Polaris Podcast.
Engine and Drivetrain Break-In
1. Fill the fuel tank with gasoline. Always exercise extreme caution whenever handling gasoline.
2. Check the oil level. Add the recommended oil as needed to maintain the oil level in the safe operating range.
3. Complete the New Operator Driving Procedures found in your Owner's Manual.
4. Avoid aggressive use of the brakes.
5. Vary throttle positions. Do not operate at sustained idle.
6. Pull only light loads.
7. Perform regular checks on fluid levels, controls and areas outlined on the daily pre-ride inspection checklist.
8. During the break-in period, change both the oil and the filter at 25 hours or one month.
9. Check fluid levels of transmission and all gearcases after the first 25 hours of operation and every 100 hours thereafter.
Brake System Break-In
Apply only moderate braking force for the first 50 stops. Aggressive or overly forceful braking when the brake system is new could damage brake pads and rotors.
RANGER XD 1500 Brake System Break-In
It is recommended that a burnishing procedure be performed on new vehicles or after installation of new brake pads or rotors. This helps to conform the pads to the rotor surface and achieve optimum braking performance. Note: The burnishing process may cause there to be brake dust on the wheels and calipers. This is normal. When the system has cooled, use a rag and soapy water (no harsh chemicals) to clean off the dust.
Test drive the machine and gradually accelerate to more than 20 mph. Apply light to moderate pressure to the brake pedal to slow the vehicle to roughly 5 mph. Repeat this process 10–30 times, allowing 30 seconds between brake applications for the system to cool down.
Important: Do not stop aggressively and do not slow to a complete stop during the burnishing process. After brake burnishing is complete, drive the vehicle to cool the brake pads and rotors.
PVT Break-In (Clutches/Belt)
A proper break-in of the clutches and drive belt will ensure a longer life and better performance. Break in the clutches and belt by operating at slower speeds during the break-in period as recommended. Pull only light loads. Avoid aggressive acceleration and high-speed operation during the break-in period. If a belt fails, always clean any debris from the PVT intake and outlet duct and from the clutch and engine compartments when replacing the belt.
- Standard Belt Break-In: Drive at slower speeds for the first 50 miles (80 kilometers) of operation. Carry only light loads. Avoid aggressive acceleration, high-speed operation and prolonged operation at a specific RPM during this period.
- Sand/Dune Belt Break-In: Drive in low gear for the first 5 miles (8 kilometers) of operation. Avoid prolonged low speed operation at high throttle. Avoid aggressive acceleration, high-speed operation and prolonged operation at a specific RPM during this period.
For more information on belt break-in, read Off-Road Vehicle Belt Break-In and Maintenance.
Youth Models
The break-in period for a youth ATV, ACE 150 or RZR 170 is the first 10 hours of operation or the time it takes to use the first two full tanks of gasoline.
The break-in period for a RANGER 150 is the first 20 hours of operation or the time it takes to use the first two full tanks of gasoline.
MODEL YEAR 2015-2022 RANGER EV MID-SIZE AND 2023+ RANGER XP KINETIC BREAK-IN
For RANGER EV models, pay attention to the above Brake System Break-In section. It's also important to make sure you are practicing proper battery maintenance on your Mid-Size EV and your XP Kinetic.
To learn more about RANGER EV and other electric vehicles, listen to the It's Electric: Understanding RANGER EV, GEM and Other Polaris Electric Vehicles episode of the Polaris Podcast.
BREAK-IN PERIOD FOR RANGER DIESEL MODELS
The break-in period for your new RANGER is the first 50 hours of operation. No single action on your part is as important as a proper break-in period. Careful treatment of a new engine will result in more efficient performance and longer life for the engine. Perform the following procedures carefully.
Note: Excessive heat build-up during the first three hours of operation will damage close-fitted engine parts. Do not operate at full throttle or high speeds for extended periods during the first three hours of use.
Engine and Drivetrain Break-In
1. Fill the fuel tank with clean, fresh fuel.
2. Check the oil level. Add the recommended oil as needed to maintain the oil level in the normal (safe) operating range.
3. Drive slowly at first. Select an open area that allows room to familiarize yourself with vehicle operation and handling.
4. Vary throttle positions. Do not operate at sustained idle.
5. Perform regular checks on fluid levels, controls and areas outlined on the daily pre-ride inspection checklist. See your Owner's Manual for more information.
6. During the break-in period, change both the oil and the filter at 50 hours.
7. Check fluid levels of transmission and all gearcases after the first 25 hours of operation and every 100 hours thereafter.
8. Pull only light loads.
PVT Break-in (Clutches/Belt)
A proper break-in of the clutches and drive belt will ensure a longer life and better performance. Break in the clutches and belt by operating at slower speeds during the break-in period as recommended. Pull only light loads. Avoid aggressive acceleration and high speed operation during the break-in period.
If a belt fails, always clean any debris from the clutch air duct and from the engine compartment. See your Owner's Manual for further information.
FINDING THE ENGINE HOURS METER
To determine how many hours your engine has on it, consult your vehicle’s instrument cluster.
For RANGER 500, 570 and XP 900 models; RZR 570, 900 and S 1000 models; and all Scrambler models besides XP 1000 S, the instrument cluster looks like this:
The rider information center (4) is located within the instrument cluster. Use the mode button (3) to toggle through the display and find the engine hour meter.
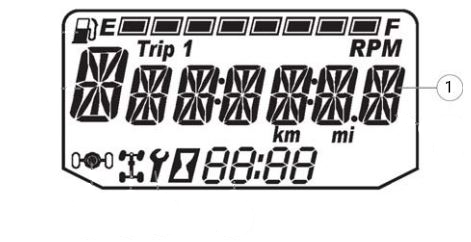
The engine hour meter can be found within the information display area (1 in below diagram) of the rider information center, along with the odometer, trip meter and programmable service hour interval.

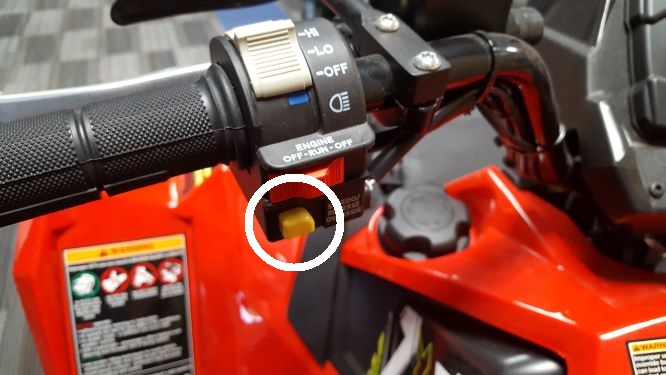
On Scrambler models, the reverse override switch on the left handlebar (pictured below) acts as the mode button when held down for approximately one half second. The override button will not function as a mode button if the transmission is in reverse.

For Polaris XPEDITION; RANGER XP 1000; GENERAL; RZR RS1, XP 1000, XP Turbo and Turbo S models, the instrument cluster looks like this:
The engine hour meter is located within the rider information center (6). Press and release either toggle button (5) to cycle through the modes.
Engine hours can be found in Area 2 (as shown below) of the rider information center.
The RZR Pro XP instrument cluster looks like this:
The engine hour meter is located within the rider information center (6). Press and release either toggle button (5) to cycle through the modes.
Engine hours can be found in Area 2 (as shown below) of the rider information center.
On the RANGER EV Mid-Size, the hour meter (2 below) can be found above the indicator lights and below the battery discharge indicator on the vehicle’s console.
On Sportsman 450, 570, 850, XP 1000 and XP 1000 S models; all ACE models; Scrambler 1000 S models; and RANGER 1000 models, the engine hours meter can be found in Display Area 2 of the instrument cluster.
Use the up and down buttons at the bottom of the instrument cluster to change the information displayed until you find the engine hours.
A basic maintenance schedule is attached here. A full list of break-in procedures, new operator driving procedures, and maintenance intervals specific to your vehicle can be found in your Owner's Manual, as well as more details about your vehicle's instrument cluster.
For more information, see your authorized Polaris Dealer. Find a dealer near you with the Dealer Locator.
Maintenance tips, procedures, specifications and more can be found in your Owner's Manual.
Unless noted, trademarks are the property of Polaris Industries Inc.
© 2021 Polaris Inc.


