

The following information applies to RUSH PRO-S, RUSH XCR, Switchback PRO-S, Switchback Adventure and Switchback XCR models.
Your Polaris snowmobile’s suspension can be adjusted to fit your individual riding style. For full details on adjustments, see your Owner’s Manual.
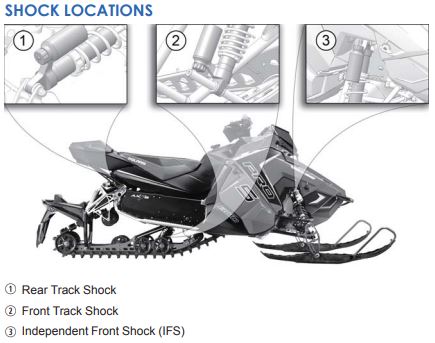
On AXYS snowmobiles, the front and rear suspension are easy to adjust. Follow these three steps:
- Ride your snowmobile. Ride the snowmobile in various terrain to fully experience the existing suspension settings before making any adjustments.
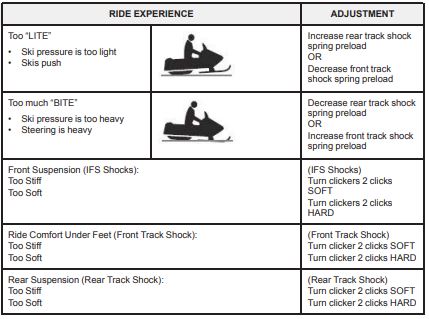
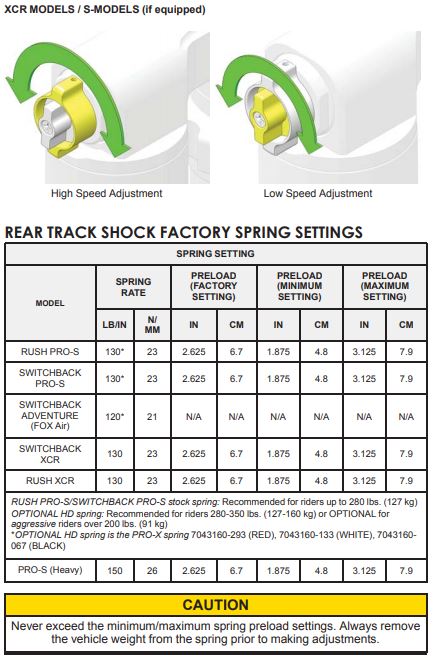
- Adjust the rear spring to tune vehicle balance. After riding, you should be able to determine if the snowmobile needs MORE “bite” or needs to be more “lite.” If the steering needs more bite, increase the rear track spring preload or decrease the front track spring preload.
If you prefer your snowmobile has lighter steering, decrease the rear track spring preload or increase the front track shock spring preload.
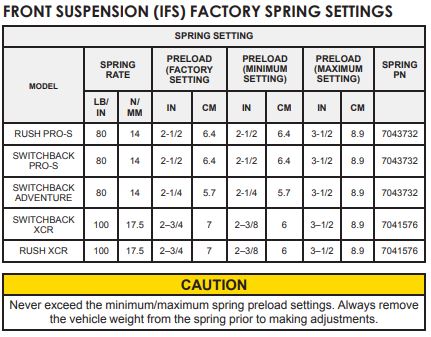
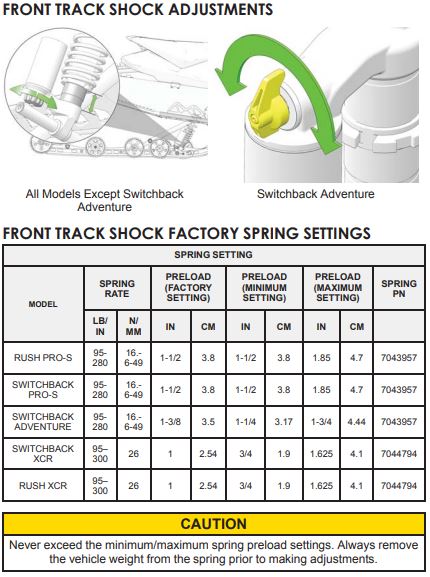
At the front of the snowmobile, if you prefer a taller ride height, increase the front suspension shock spring preload settings. Likewise, if you prefer your snowmobile has a lower ride height, you can decrease the front suspension shock spring preload settings. - Adjust shock clickers (if equipped) for ride quality. For models equipped with monotube shocks, always adjust the rear track shock spring preload to enhance bottoming resistance.
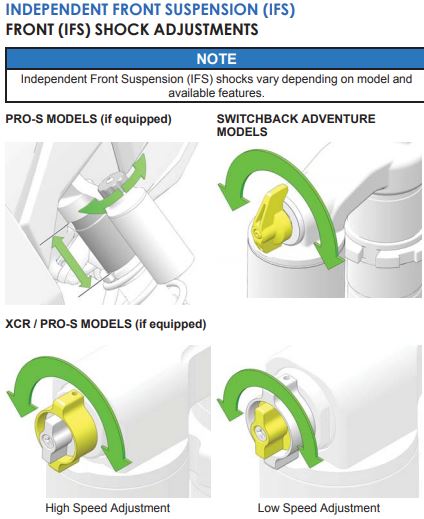
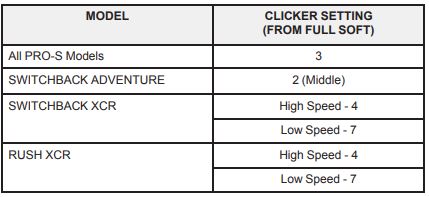
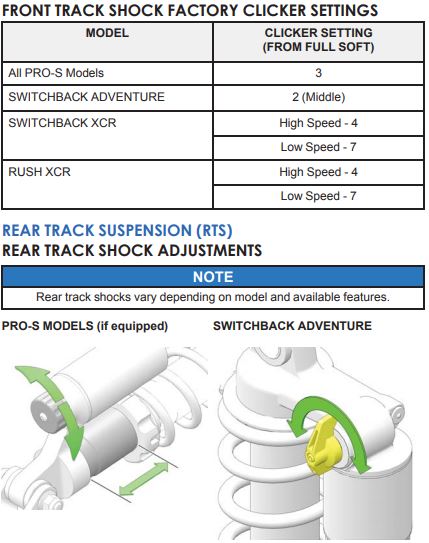
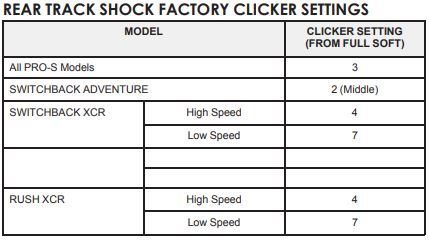
For models with short clickers, you can adjust the clickers to control bottoming and adjust ride comfort.
Turn a clicker counter-clockwise to decrease damping for a softer ride. Turn a clicker clockwise to increase damping for a stiffer ride and less bottoming. Always adjust the clicker at least one click below full stiff (full clockwise) or shock damage will occur.
Test the snowmobile and continue making spring and clicker adjustments until you achieve the perfect ride. Adding traction components, such as traction studs are additional ski skag carbides, or changing the factory equipped track, could change handling characteristics. Additional setup may be required.

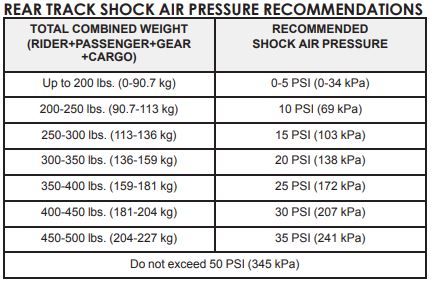
Rear Track Shock Air Pressure (Switchback Adventure)
The factory-installed air assist rear shock contains zero air pressure, which will provide an optimum ride when combined rider and cargo weight is less than 200 pounds (90.7 kg). if rider and cargo weight exceed 200 pounds, use the following procedure to increase shock air pressure to the setting recommended for your combined rider and cargo weight. The shock air pump is located in the protective bag under the cargo rack.
1. Remove the air valve from the shock.
2. Thread the pump’s valve chuck onto the shock’s air valve until pressure registers on the gauge (approximately six turns). Do not over-tighten. This will damage the chuck seal.
3. Stroke the pump a few cycles. Pressure should increase slowly. If pressure increases rapidly, make sure the pump is properly fitted and tightened onto the air valve. If the shock has no air pressure, the gauge will not register pressure.
4. Continue pumping to the desired pressure setting. Do not exceed 50 PSI (345 kPa).
5. To decrease pressure, push the black bleed valve button. When held partially depressed, air will escape steadily from the pump and shock. To make a micro-adjustment, press and release the button. Only a small amount of air will escape.
6. Disconnect the pump from the shock. While disconnecting, the sound of air escaping is from the pump hose, not from the shock.
7. Reinstall the air valve cap.
Limiter Strap Adjustment
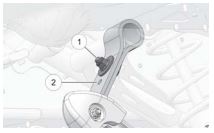
The front torque arm limiter strap is set at position (1). Polaris recommends leaving the limiter strap length at position (1) to maintain the optimum ride characteristics of the snowmobile. Riders who desire less ski pressure and more weight transfer toward the rear of the snowmobile can lengthen the limiter strap by changing to position (2).
1. Loosen the lock nut.
2. Adjust the limiter strap.
3. Tighten the lock nut. Torque to 16 ft-lbs (21 Nm).
For more information, see your authorized Polaris Dealer. To find a dealer near you, use the Dealer Locator.
Maintenance tips, procedures and specifications can be found in your Owner's Manual.
To find diagrams and replacement part numbers, use the online parts catalog.
Unless noted, trademarks are the property of Polaris Industries, Inc.
© 2022 Polaris Inc.


